Get Started

PREREQUISITES
In order to implement the Movement SDK in your app, you must first complete the following:
- Movement SDK Access Enabled
- Foursquare Developer Account w/ ClientID + Secret
1. Register App Bundle ID
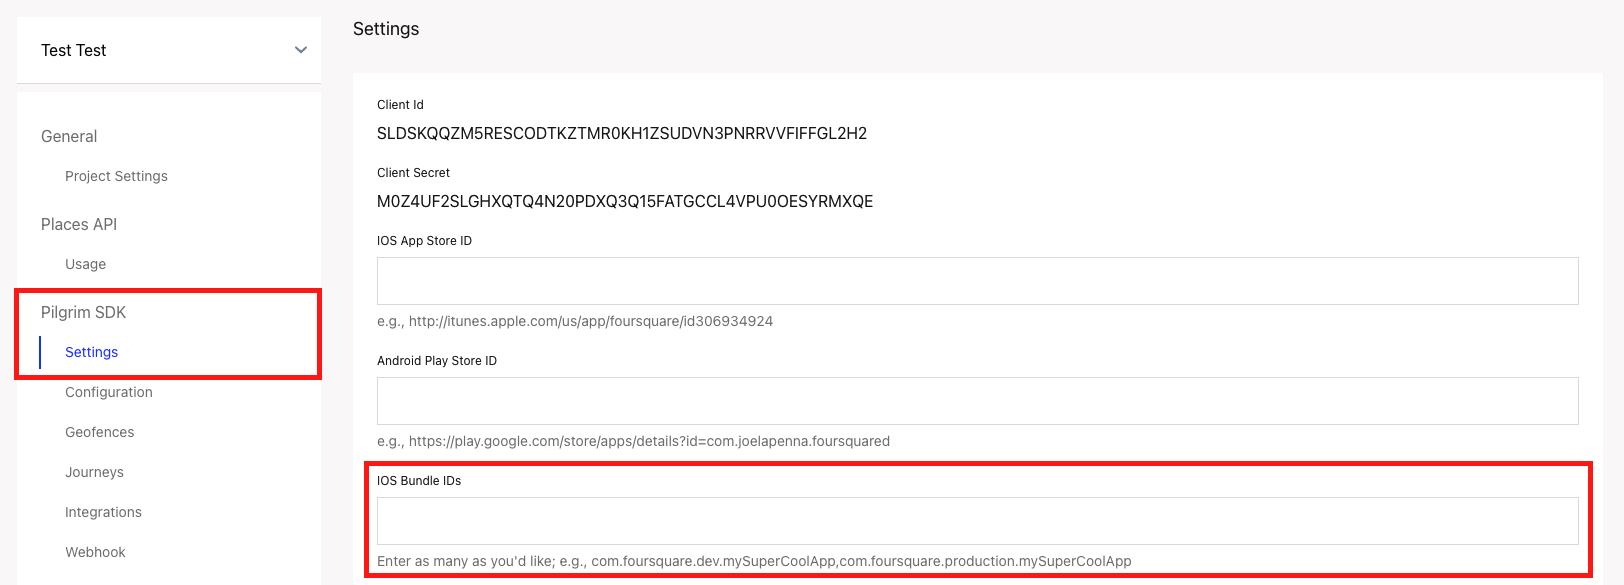
In order for the Movement SDK to authenticate with our server, you'll need to add your iOS Bundle ID to your Foursquare app's configuration.
-
Navigate to your Foursquare Developer Console and select your app, then:
-
Find your app's Bundle Identifier. This can be found in the Identity section of your project's General tab:

- In your Foursquare Developer Console on the Movement SDK Settings page, paste your iOS Bundle ID in the iOS Bundle IDs field.

Note: you can add multiple bundle IDs delimited by commas.
- Save your changes.
2. Install the Movement SDK

Option 1 - Carthage
- Add the following to your
Cartfile:
binary "https://foursquare.jfrog.io/foursquare/movementsdk-ios/MovementSdk.json" ~> 4.0.0
-
Navigate to Carthage/Build/iOS and drag the
MovementSdk.frameworkfile into Xcode in the Link Binary With Libraries section. -
Add a run script with the following script:
/usr/local/bin/carthage copy-frameworks -
Set the Input Files to:
$(SRCROOT)/Carthage/Build/iOS/MovementSdk.framework -
Load the MovementSDK library into any necessary files by adding
import MovementSdk. -
Build your project.
Option 2 - CocoaPods
-
If you don't already have CocoaPods initiated in your project, enter the following command into the terminal:
pod init -
Add the following to your Podfile:
pod 'MovementSdk', '~> 4.0.1'
-
Enter the following command into the terminal:
pod install(If you experience errors, trypod update. You can read about the difference here.) -
Load the MovementSDK library into any necessary files by adding
import MovementSdk. -
Build your project.
Option 3 - Swift Package Manager
- In Xcode, install the Movement SDK by navigating to File > Add Packages…
- In the prompt that appears, search for the Movement SDK with the following Package URL:
https://github.com/foursquare/movementsdk-ios-spm - Select the version of the Movement SDK you want to use. For new projects, we recommend using the newest version of the Movement SDK.
3. Configure the Movement SDK
a. Configure Permissions
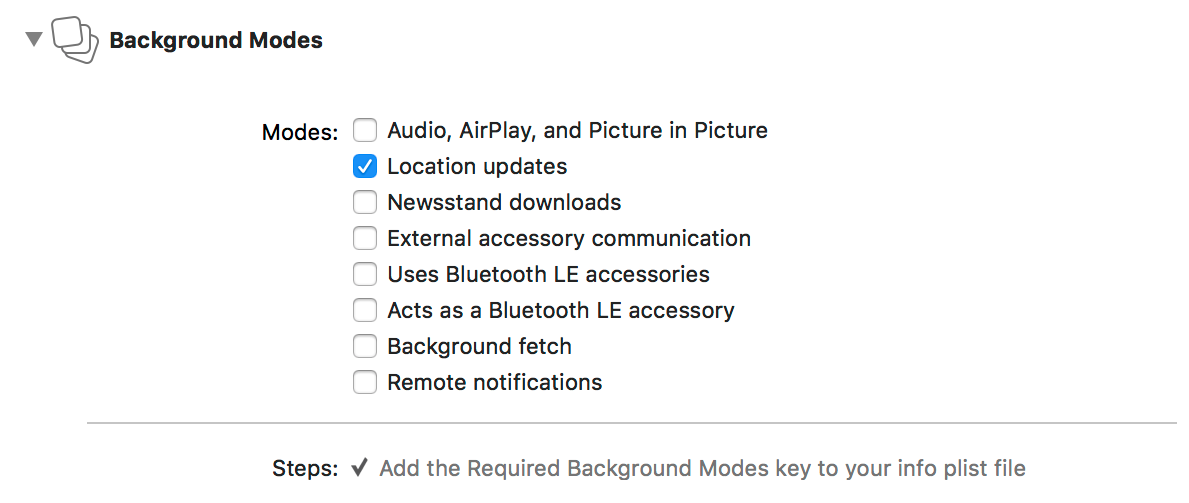
- Turn Background Modes to On in your project's Capabilities tab and enable the Location updates checkbox:

-
Add the following to your iOS permission strings in your project's Info.plist file:
- Privacy - Location Always Usage Description
- Privacy - Location Always and When In Use Usage Description
- Privacy - Location When In Use Usage Description

b. Configure your AppDelegate
Configure the Movement SDK by pasting the following code in the didFinishLaunchingWithOptions method of your AppDelegate. Be sure to replace CLIENT_ID and CLIENT_SECRET with your real API credentials.
MovementSdkManager.shared().configure(withConsumerKey: "CLIENT_ID", secret: "CLIENT_SECRET", delegate: self, completion: nil)
If you are leveraging the Movement SDK in conjunction with the Personalization API, make sure to also include oauthToken parameter in the below code. Be sure to replace OAUTH_TOKEN with the real Managed User OAuth token.
MovementSdkManager.shared().configure(withConsumerKey: "CLIENT_ID", secret: "CLIENT_SECRET", oauthToken: "OAUTH_TOKEN", delegate: self, completion: nil)
Common Mistake: Why must the SDK's configuration live in the AppDelegate's
didFinishLaunchingWithOptionsand not somewhere else like a view controller?It relates to how the SDK functions within iOS's app life cycle. The SDK works in the background and the
didFinishLaunchingWithOptionsmethod is the ONLY part of the app's life cycle that is guaranteed to be called, even when the app is in the background. When you put the SDK's configuration and notification handlers in another location, it only gets called when that app is active, meaning you miss a ton of your user's visit activity.
c. Disable AdId transmission
If you're using the free tier or do not have a data sharing agreement, you don't need to transmit the phone's mobile AdId to Foursquare. While we currently just disregard the AdId in these cases as soon as it is received, version 2.2.2+ gives you the ability to disable the device from even sending it to Foursquare by setting the following:
# before the configure call:
MovementSdkManager.shared().disableAdIdentitySharing = true
d. Conform to the Movement SDK Delegate
Have your AppDelegate conform MovementSdkManagerDelegate by pasting the following code just below your AppDelegate class:
extension AppDelegate : MovementSdkManagerDelegate {
  // Primary visit handler:
  func movementSdkManager(_ movementSdkManager: MovementSdkManager, handle visit: Visit) {
    // Process the visit however you'd like:
    print("\(visit.hasDeparted ? "Departure from" : "Arrival at") \(visit.venue != nil ? visit.venue!.name : "Unknown venue."). Added an SDK visit at: \(visit.displayName)")
  }

  // Optional: If visit occurred without network connectivity
  func movementSdkManager(_ movementSdkManager: MovementSdkManager, handleBackfill visit: Visit) {
    // Process the visit however you'd like:
    print("Backfill \(visit.hasDeparted ? "departure from" : "arrival at") \(visit.venue != nil ? visit.venue!.name : "Unknown venue."). Added an SDK backfill visit at: \(visit.displayName)")
  }

  // Optional: If visit occurred by triggering a geofence
  func movementSdkManager(_ movementSdkManager: MovementSdkManager, handle geofenceEvents: [GeofenceEvent]) {
    // Process the geofence events however you'd like. Here we loop through the potentially multiple geofence events and handle them individually:
    geofenceEvents.forEach { geofenceEvent in
      print(geofenceEvent)
    }
  }

  // Optional: If there is an update to the user state
  func movementSdkManager(_ movementSdkManager: MovementSdkManager, handleUserState updatedUserState: UserState, changedComponents: UserStateComponent) {
    switch changedComponents {
    case .city:
      print("Welcome to \(updatedUserState.city)")
      // handle other cases
    }
  }

  // Optional: If there is an error
    func movementSdkManager(_ movementSdkManager: MovementSdkManager, handle error: Error) {
      // handle any Movement SDK errors
      print(error)
    }
  }
Note the four delegate callbacks you may receive:
handle visit: The primary visit callback that receives arrival and departure events.handleBackfill visit: This callback receives visits that occurred historically when there was no network connectivity or for failed visits that have been retried.handle geofenceEvents: This callback receives any geofence events configured in the Developer console.handleUserState: This callback receives any updates to the user state.handleError: This callback receives any Movement SDK errors
4. Initialize the Movement SDK
Once the SDK is configured and set up to handle location events, you need to request location permissions from your user and tell the SDK to start running by calling start when .authorizedAlways:
MovementSdkManager.shared().start()
Note: You must make sure the user has provided access to background location permissions before starting the SDK. It is your responsibility as a developer to inform the user of how you are using these permissions and how it benefits them.
To help you maximize the number of users that opt into "Always" location sharing and your Movement SDK powered features, here are some recommendations for how you should handle requesting permissions:
- Ask for location permission only when a user accesses a feature that uses location.
- Make sure it's clear, in the app, why the user should provide access to their location and how it benefits their app experience.
- After asking for location permissions in the app, consider adding a screen that informs the user that they will be later asked for "Always" permission. This screen should clearly explain the value the user gains by providing "Always" location.
- If the user declines to give "Always" permission, consider places in your app that you can promote features that make use of background location.
- Lastly, we expect that most or all of your existing users that are on iOS 13 will see a prompt displaying a map of recent locations, and an option to "Change to While Using". Please review your
NSLocationAlwaysAndWhenInUseUsageDescriptionstring in your plist to ensure it clearly states the feature and value to the user.
a. Request Foreground Location
The Movement SDK's traditional visit detection works effortlessly in the background, allowing continued interaction with your users regardless of if they are in your app or not. But what about when you want to manually find a user's current location while they are interacting within your app? The SDK allows you to actively request the device's current location manually when the app is in use by calling the below method:
MovementSdkManager.shared().getCurrentLocation { (currentLocation, error) in
   // Example: currentLocation.currentPlace.venue.name
}
Note: This method can be used with users that have only given 'When In Use' location permissions and is a great workaround to satisfy our SDK's 'Always On' location permission requirement.
This will return the current venue the device is most likely at (in the currentLocation object), as well as any geofences that the device is in (if configured). Note that this foregoes any "stop detection" so it shouldn't be used as a proxy for visits. For example, this method could return a high confidence result for Starbucks if called while someone is walking by the entrance.
Seeing getCurrentLocation nil or error responses?
Please refer to our Test & Troubleshoot guide on how to handle these responses.
Optional Configurations
Adding Wifi Entitlement
As of iOS 13.0 in order for the Movement SDK to collect Wifi Scans the app must be configured to access Wifi information via the Wifi Entitlement. This optional step involves editing the app configuration, regenerating provisioning profiles, and updating the app in Xcode.
1. Editing the app configuration
Go to the Certificates, Identifiers & Profiles portal on the Apple Developer site, then click on Identifiers, then select the app identifier you want to add the Wifi Entitlement to. In the Capabilities section enable to Access WiFi Information capability and click Save. A warning will be displayed about regenerating the provisioning profiles, click Confirm, we will regenrate them in the next step.
2. Regenerate provisioning profiles
Still on the Certificates, Identifiers & Profiles portal, click on Profiles to list the provisioning profiles, you will need to regenerate any profile that was created for the app identifier updated in the previous step (the profile should have an expiration date of 'Invalid'). Select the profile and click the Edit button, then click Save. In the profile list the expiration date should no longer be 'Invalid'
3. Update the app in Xcode
In Xcode, open the preferences pane (Xcode > Preferences) then select Accounts. Select your Apple ID and team, then click Download Manual Profiles. In the Project Navigator select the Xcode project file (.xcodeproj) and go to the Signing and Capabilities pane. Select the + Capability button and double click on Access Wifi Information. This will add the com.apple.developer.networking.wifi-info key to your Entitlements plist file. In the signing configurations if you see an error saying the provisioning profile does not include the com.apple.developer.networking.wifi-info entitlement, then you need to redownload the provisioning profiles again through Xcode or manually using the Developer portal.
Updated about 1 year ago
