
Build an Audience Segment
Welcome to our full guide for creating a segment in the Audience Designer tool. While this guide offers a full look into Foursquare's Audience Designer, be sure to use the sidebar to jump to relevant sections.
Account required!Building an audience segment requires an account. If you do not have an account, please visit our customer support portal for further support.
Create a New Design
Before we can begin designing our segment, we must initialize the project. This task is simple, but might have a few nuances depending on your DSP.
- Go to the Audience tab at targeting.foursquare.com, then click Create New Design.
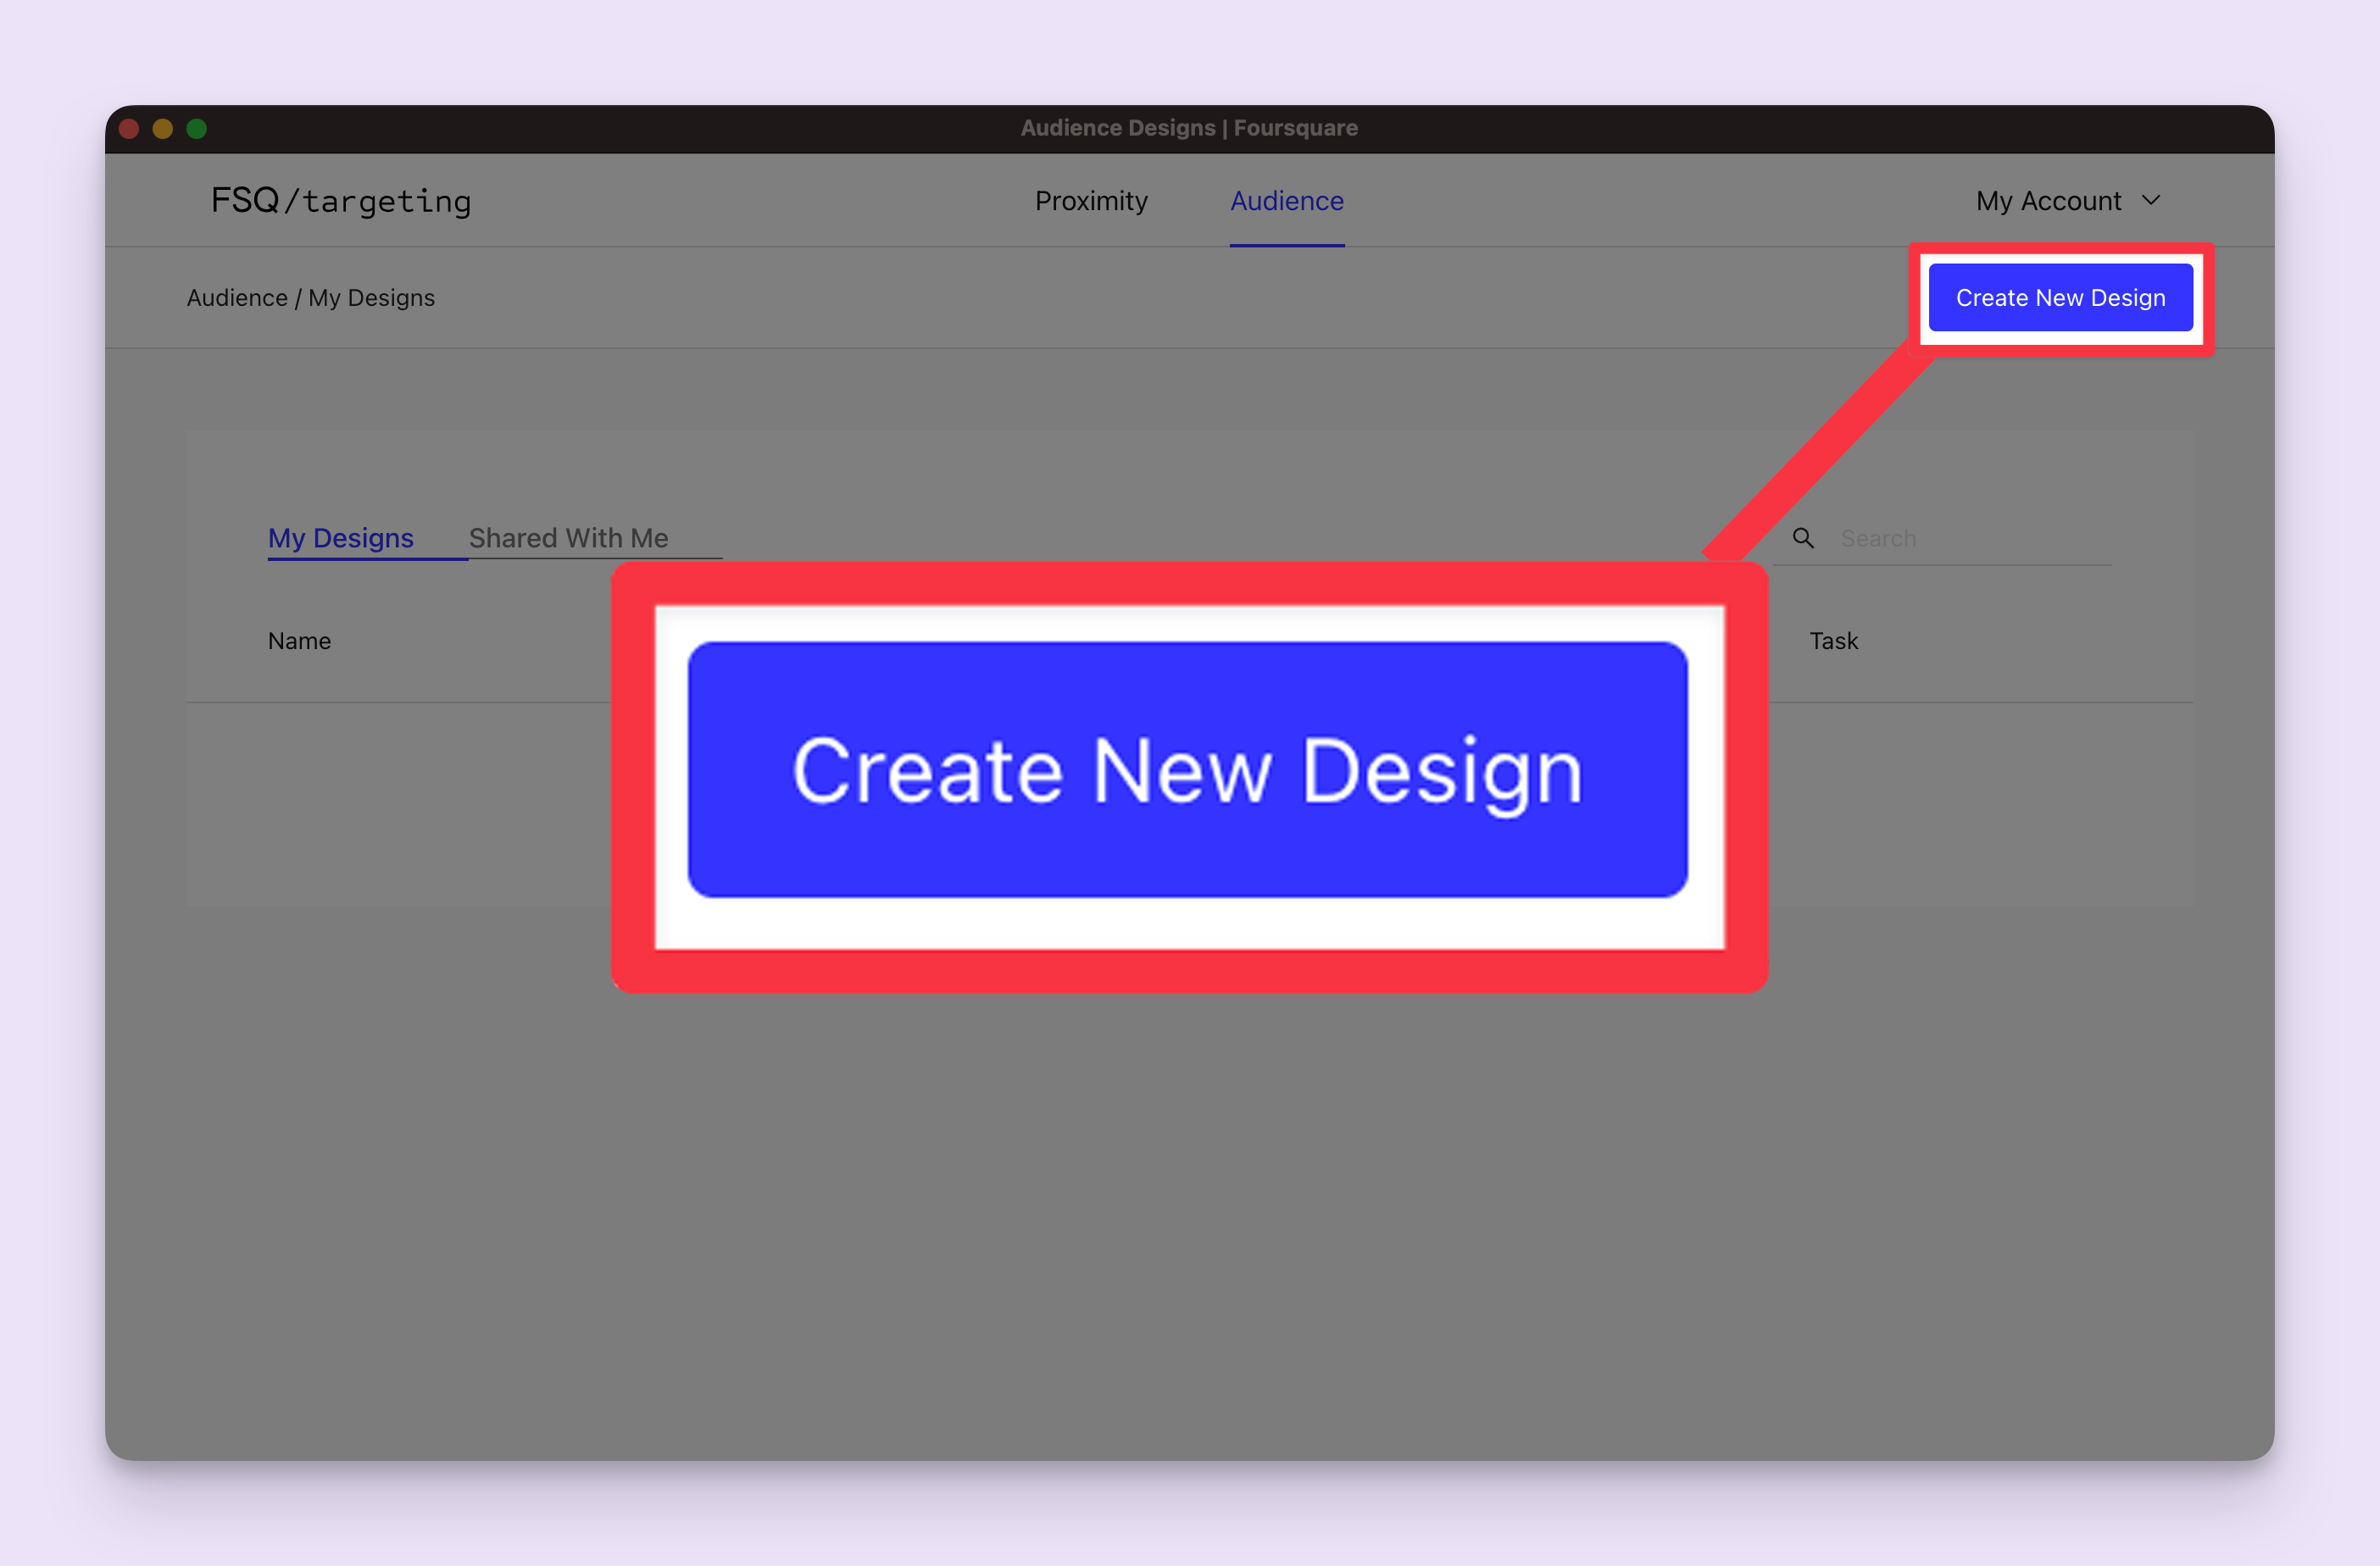
The Create New Design button on the audience panel.
- The audience designer window appears. Text the top text fields are required before continuing:
| Field | Description |
|---|---|
| Design Name | A name for your design that will appear in Foursquare Audience. |
| Targeting Code | The ID you use to locate the segment within the DSP after deployment. Most DSPs do not have specific naming conventions, so you are free to name your segment however you’d like. |
Basis DSP: Best PracticesIf you are building a segment to activate in Basis DSP, we recommend following the below naming convention for both Design Name and Targeting Code:
- BasisAdvertiserID_SegmentDetail_EndDateofCampaign
- For example, we had an advertiser ID
123456, a segment detail calledHighValueCustomers, with a campaign end date of2/29/2024, we would name the segment123456_HighValueCustomers_20240229.
Upon naming your design and specifying a targeting code, you're ready to begin designing your audience. You'll notice that your audience estimate is the full extent of the Foursquare targetable reach based on a broad 1+ year lookback, and no filters or criteria are applied.
This is the blank slate upon which we will generate custom-tailored segments.
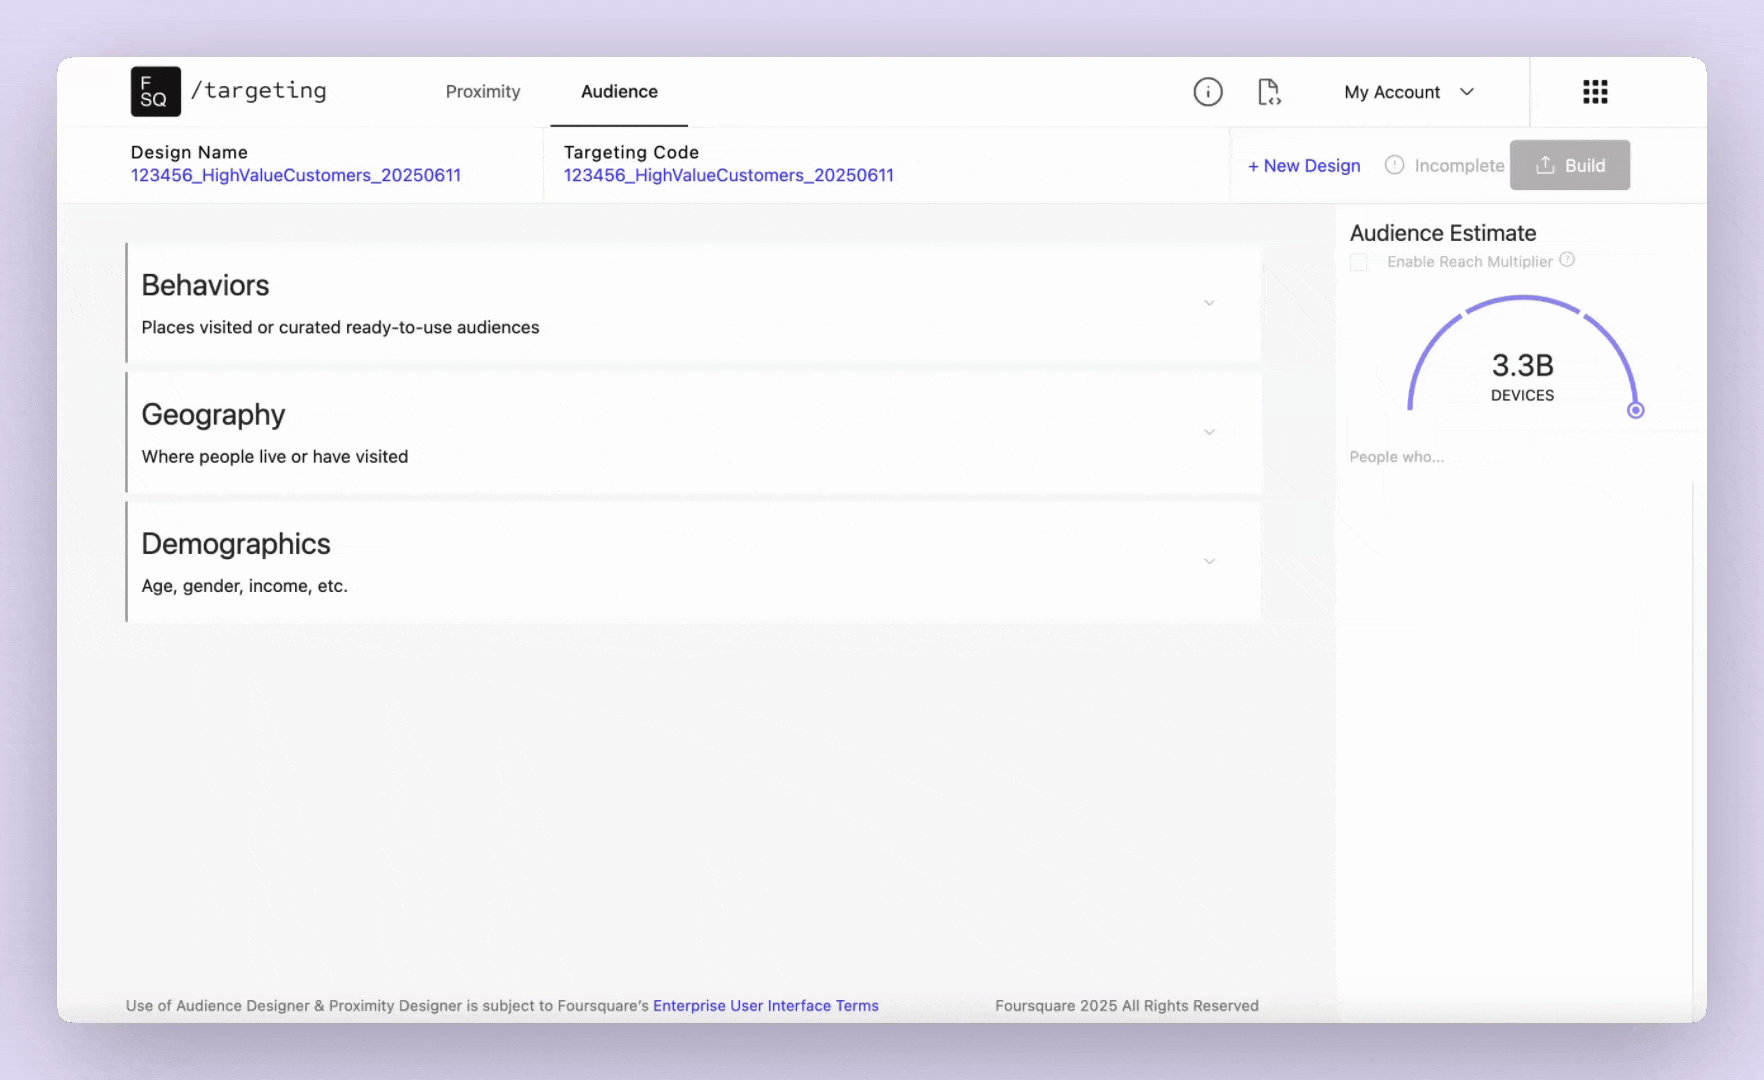
The Audience Designer user interface.
- Start designing your Audience via the 3 audience modules: Behaviors, Geography, and Demographics.
| Module | Description |
|---|---|
| Behaviors | Select POIs that the users in your segment have visited, have not visited, or likely live near. Layer ready-to-use audiences created by Foursquare. |
| Geography | Select geographies where users in your segment live, do not live, have visited, or have not visited. Granularity starts at the Country level and allows for higher-resolution options such as State, Locality, Postcodes, and DMA. |
| Demographics | Select for or filter characteristics such as age, household income, parental status, gender, and much more. |
In the next few sections, we are going to walk through each of these modules, fully configuring them with real examples. After, we will return to the top-level view to manage and configure how these modules interact with one another.
Behaviors
Behaviors is the core module of Audience. Here, we define the audience's visitation habits (whether they have been to, have not been to, or likely live near the given points of interest), and other ready-to-use audiences designed by Foursquare.
Places Visited

The places visited section of Behaviors.
As mentioned above, the places visited section in the behaviors module allows you to target an audience that:
- Has been to a location
- Has not been to a location
- Lives near a location
Country
You can only target an audience from one country for your segment. Choose a country from the given list.
Country selection filters placesPlaces, chains, and categories will be filtered to only those present in the selected country.
Lookback Window
By default, Foursquare Audience limits the lookback window to the previous month. Any user that has visited the location in the month prior to the current day will be added to the audience.
To change your lookback window, click In the past 1 month, then select a new lookback window. Select From.. to choose a start/end date on the calendar.
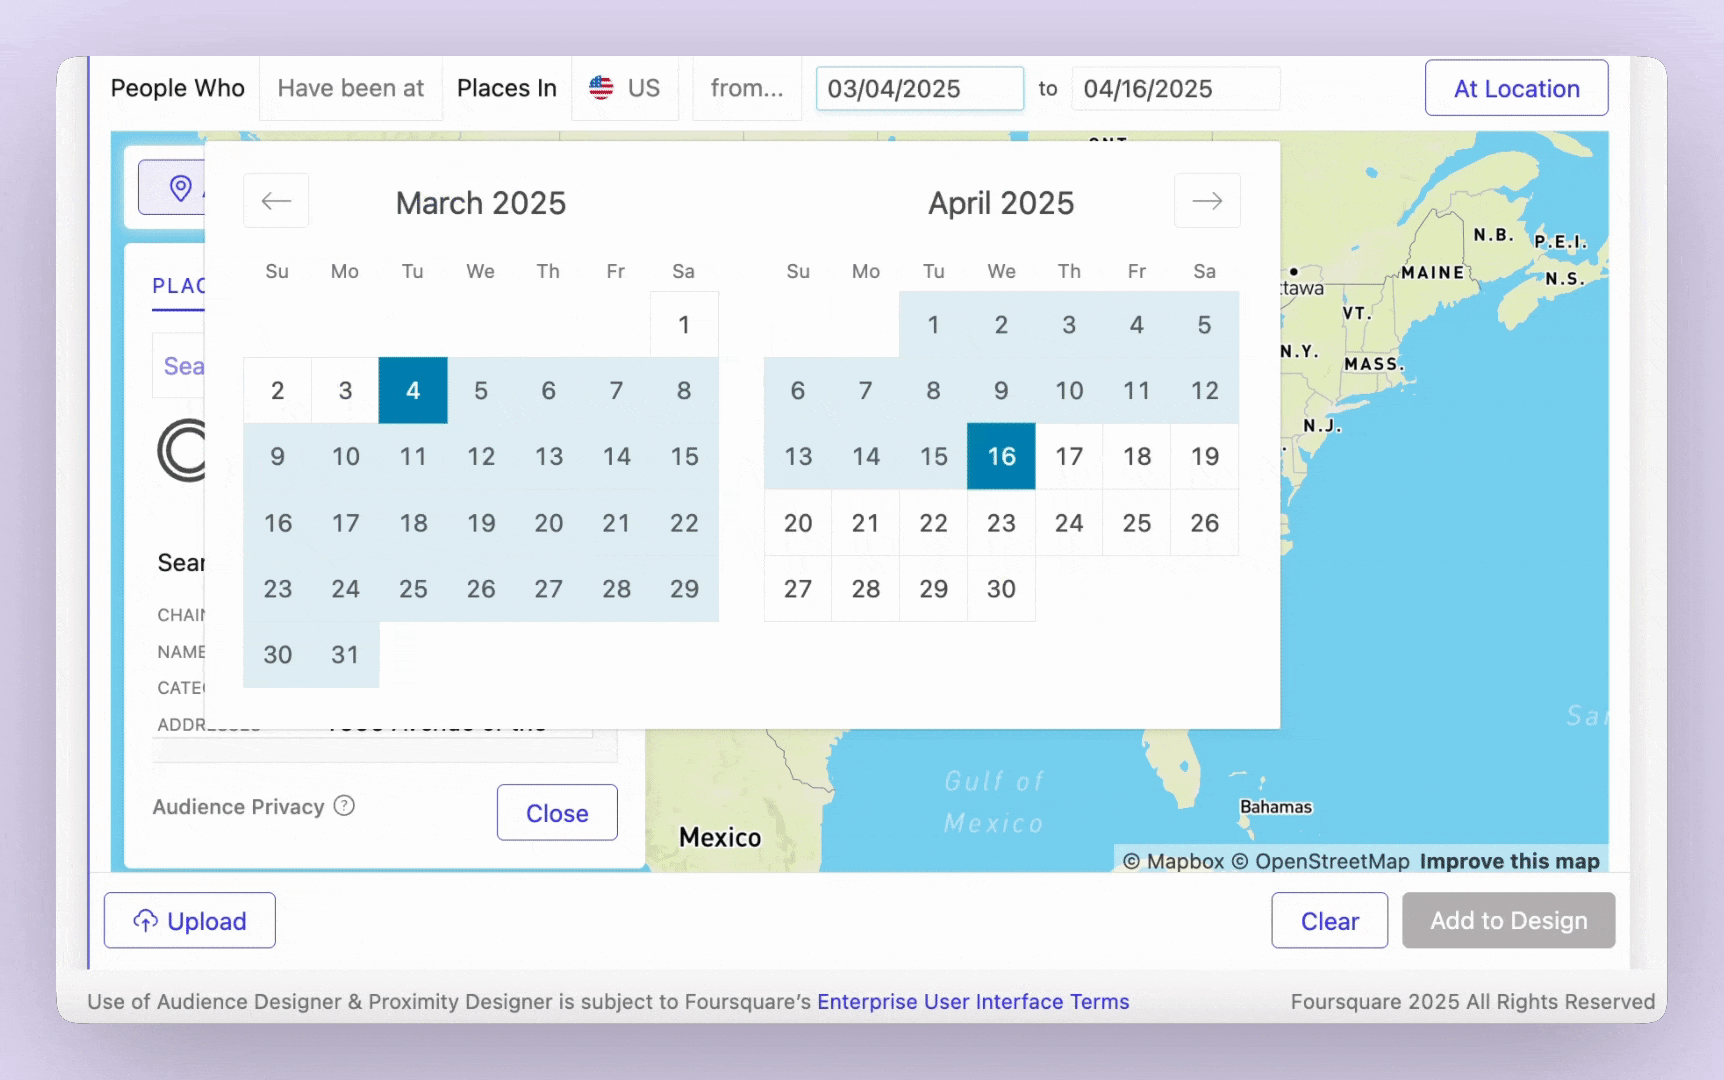
The calendar lets you select precise lookback window.
We recommend a lookback window of 3-6 monthsIt’s possible to use a lookback window of up to 18 months for visitation in the Audience Designer.
However, using a 3–6 month lookback window strikes a balance between recent visitation and audience scale while aligning with typical consumer behavior, such as updating or changing their devices.
Location Targeting
Foursquare Audience defaults to targeting users that we detected at the location.
If instead you wish to select an audience that has been near a given location, click At Location, then switch to an In Radius selector. Enter a number and select a unit of measurement (from feet, meters, kilometers, and miles).
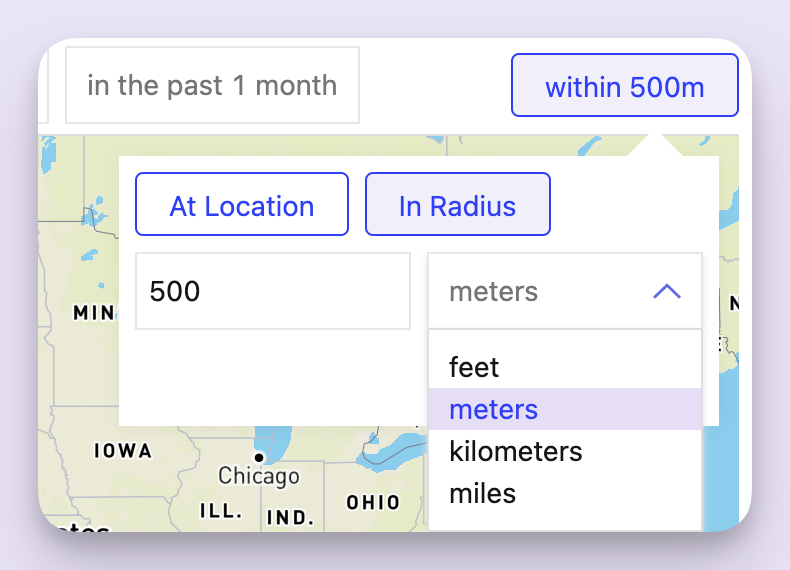
Reaching an audience that has been within 500 meters of the location.
Time Tools Require At Location Location TargetingIf you wish to filter your audience by their frequency of visitation, time part of visitation (Morning, Afternoon, Night), or the day of the week they visit, use At Location targeting. Learn more.
Add Places
There are three ways of adding places to your segment:
| Method | Description |
|---|---|
| Places | Search for any type of place, including chains (e.g. "Starbucks"), names (e.g. "Galaxy Auto"), categories (e.g. "Park"), addresses (e.g. "1999 Main Street"), or specific places (e.g. "LAX") |
| Chains | Select from chains Foursquare has indexed in the given country. Scroll through the list or use the search box to find a chain |
| Categories | Select from general categories and subcategories of businesses, such as "Fashion", or its subcategory "Shoes" |
| File Upload | Upload a file with location data. Read more. |
You can mix and match these methods of adding places while creating your segment. Search for specific places, add specific chains, and incorporate general categories into your segment.
Consumer PrivacyFoursquare limits certain categories and places from being targeted in Proximity and Audience. We also require your audience to include at least 5,000 devices.
Still have questions? Visit our customer support portal for further support.
File Upload
You may also upload your own location data to the Audience designer.
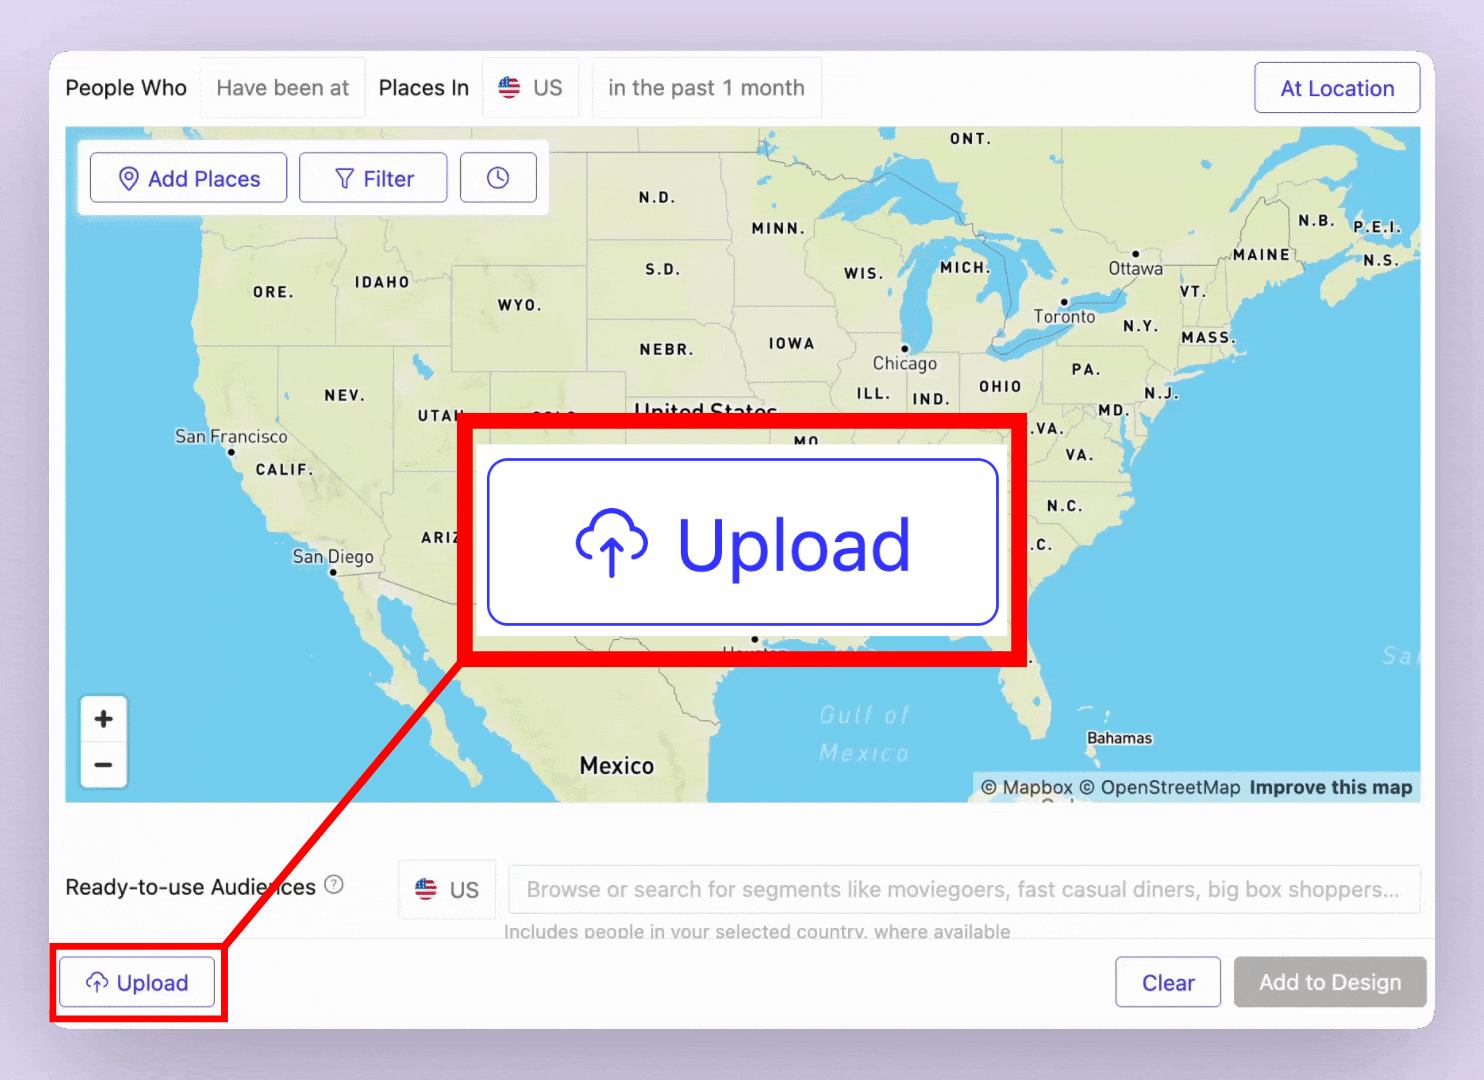
The Upload button in Audience designer.
Audience's File Upload supports both point and polygon data.
| Type | Formats | More Information |
|---|---|---|
| Points | CSV, TSV, Excel | Requires a latitude and longitude column. More information and example templates. |
| Polygons | WKT, GeoJSON | Requires shape information, depending on the format. More information and example templates. |
File upload has a size limit of 5mbIf this limitation presents an issue, please reach out at [email protected]
Displayed RowsWhen uploading locations, the Designer will only show the first 1000 rows from your uploaded data on the map. All rows will be included in the build.
Filter
After places have been added to the map, you can filter them by their Geo (location), Name, Category, or any other specification in Advanced.
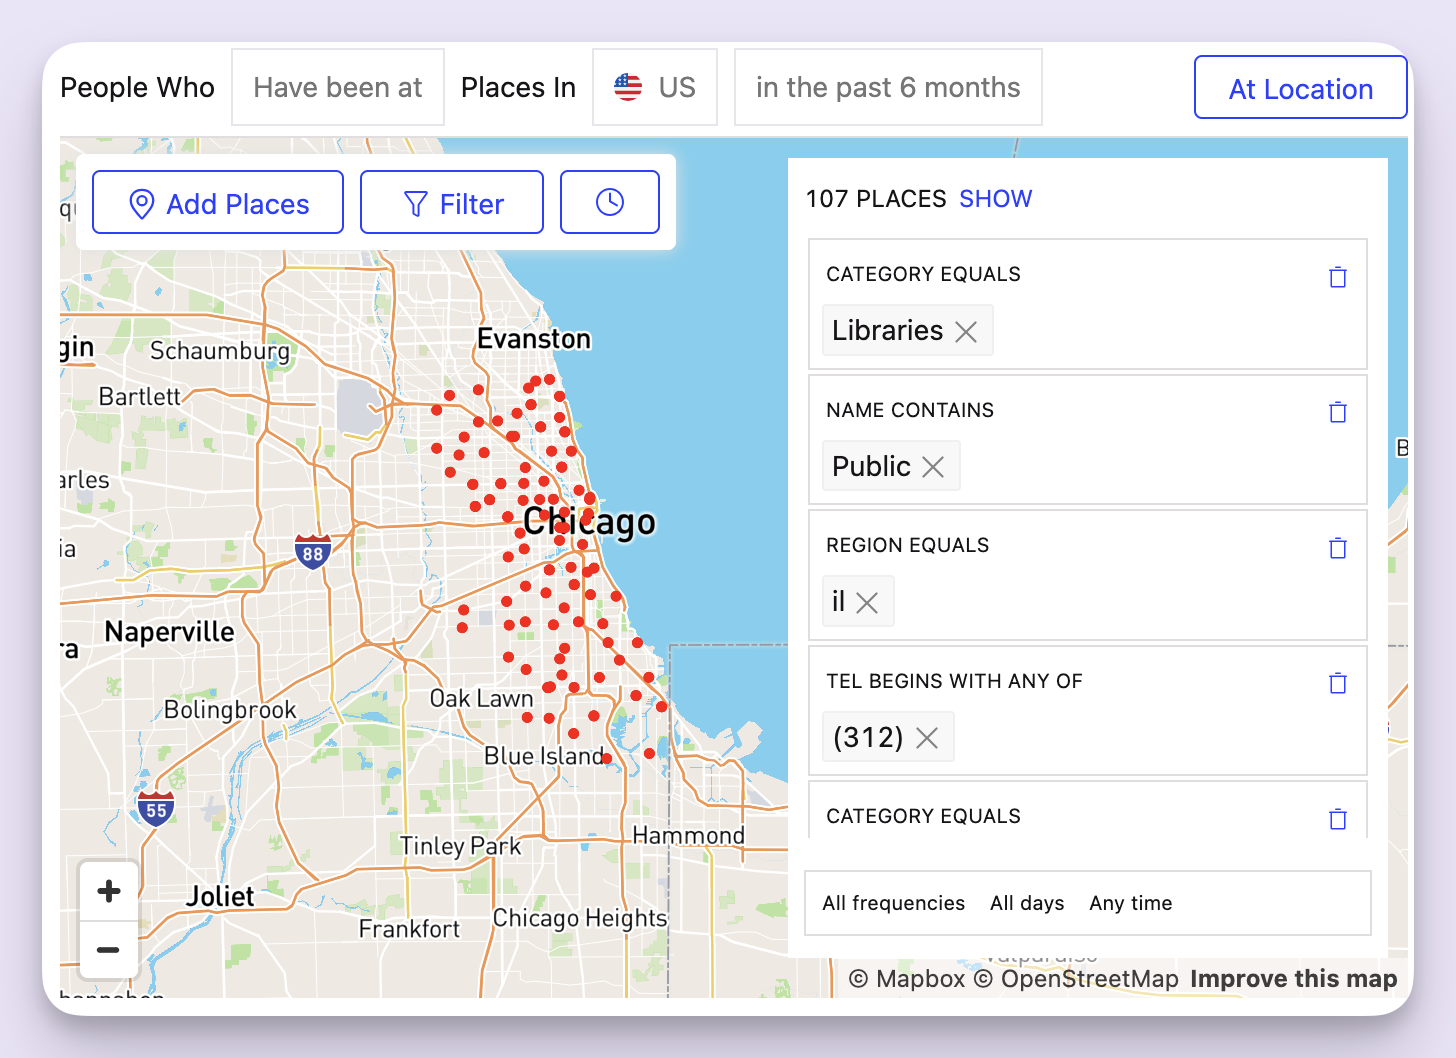
Filtering libraries to those with a specific area code.
Geo
The Geo section contains the following options for location filtering:
Note: The following options vary by the selected country.
| Option | Description |
|---|---|
| State/Region | A state or region. |
| Locality | A locality, or metropolitan area. |
| DMA | Designated Marketing Area. Contains the DMA's number and city/town composition. US Only. |
| Urban Density | The urban density rating, including Low, Medium, and High. Low represents more rural areas and small towns, Medium represents suburbs and small cities (such as Madison, Wisconsin; Fresno, California; and Albany, NY), while High is for cities (Such as Los Angeles, Chicago, and New York). US Only. |
Name
Apply a filter to the name.
Simply enter text, then select Should contain if the locations should contain the given text, or Should not contain if the location should not contain the given text.
Category
Select only locations that are within the given category.
For example, if you are advertising consumer home improvement tools, you may wish to filter by Home Improvement >> Hardware Stores. This would filter many locations from your segment that may have made their way into the segment, such as contractor businesses or other undesired locations.
Advanced
WarningAdvanced settings are for users who have experience with Foursquare Audience and other products. We recommend you do not apply any advanced filters unless you are certain about the content you are filtering.
Advanced settings allow you to filter on more of Foursquare's data elements. You can select whether the given field should, with respect to your segment's place:
- Begin with/Does not begin with the text,
- Contain/Does not contain the text,
- Equals/Does not equal the text.
The following advanced filtering options are available:
| Option | Description | Example |
|---|---|---|
| Address | The full address of a location. | 476 5th Ave, New York, NY, 10018, US |
| Category ID | Category ID string. | |
| Factual/Foursquare ID | Factual or Foursquare ID for the location. | 369265e7-817e-45e1-ad92-087424ee169b |
| Locality | The locality of the location. | New York |
| Name | A full name of the location. | New York Public Library |
| Post Code | A postal code for the location. | 10018 |
| Tel | The telephone number of the location. | (917) 275-6975 |
| Website | The URL for the location's website. | http://www.nypl.org |
Time
There are a number of options related to how your audience visits the location from a temporal perspective, including:
- Frequency, or the visitation rate
- Days of the Week
- Time of Day
These tools are only available for locations added from the audience designer. They are not available from file uploads.

The time options in Foursquare Audience.
Frequency is determined by evaluating the overall visitation to the location.
- High frequency are those that visit most frequently, such as employees or loyalists.
- Medium frequency are those who visit the location often.
- Low frequency are those that only occasionally visit the location.
Time options are not available for "In Radius" detectionLocation targeting must be set to At Location to use time options.
Ready-to-use Audiences
Ready-to-use audiences are hand-curated, based on real-world behavior patterns. To design these, our models account for an audience's consumer lifestyle, visitation to chains, place categories, and more.
Please note that ready-to-use segments are created at the country level and cannot be customized for specific geographic regions. The default setting is the U.S., but it can be changed to a select number of other countries.
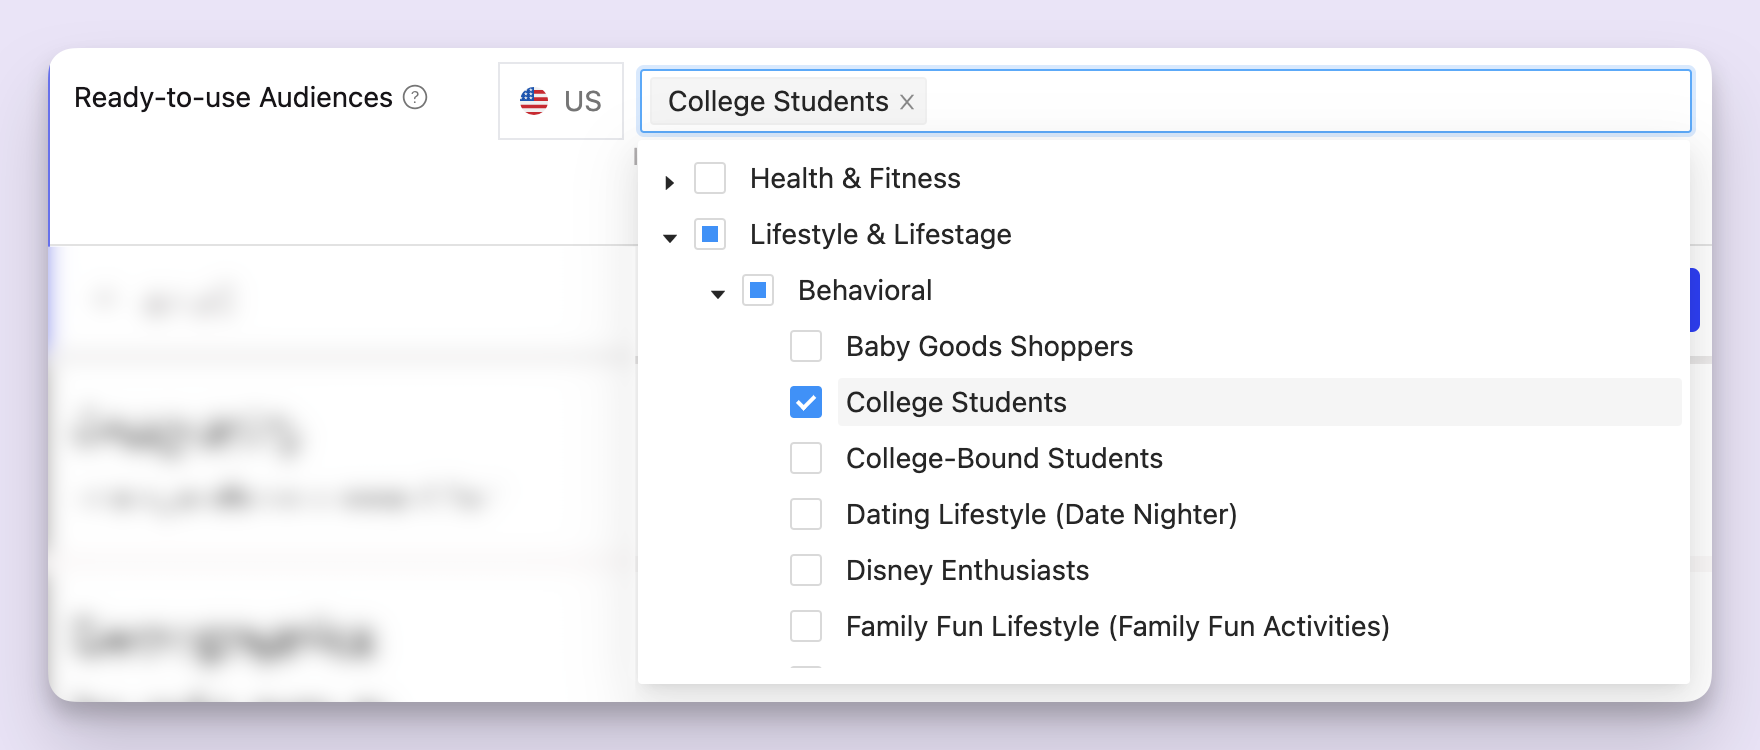
Selecting the college students ready-to-use audience.
Geography
The geography selector allows you apply another level of location selection to your audience segment.
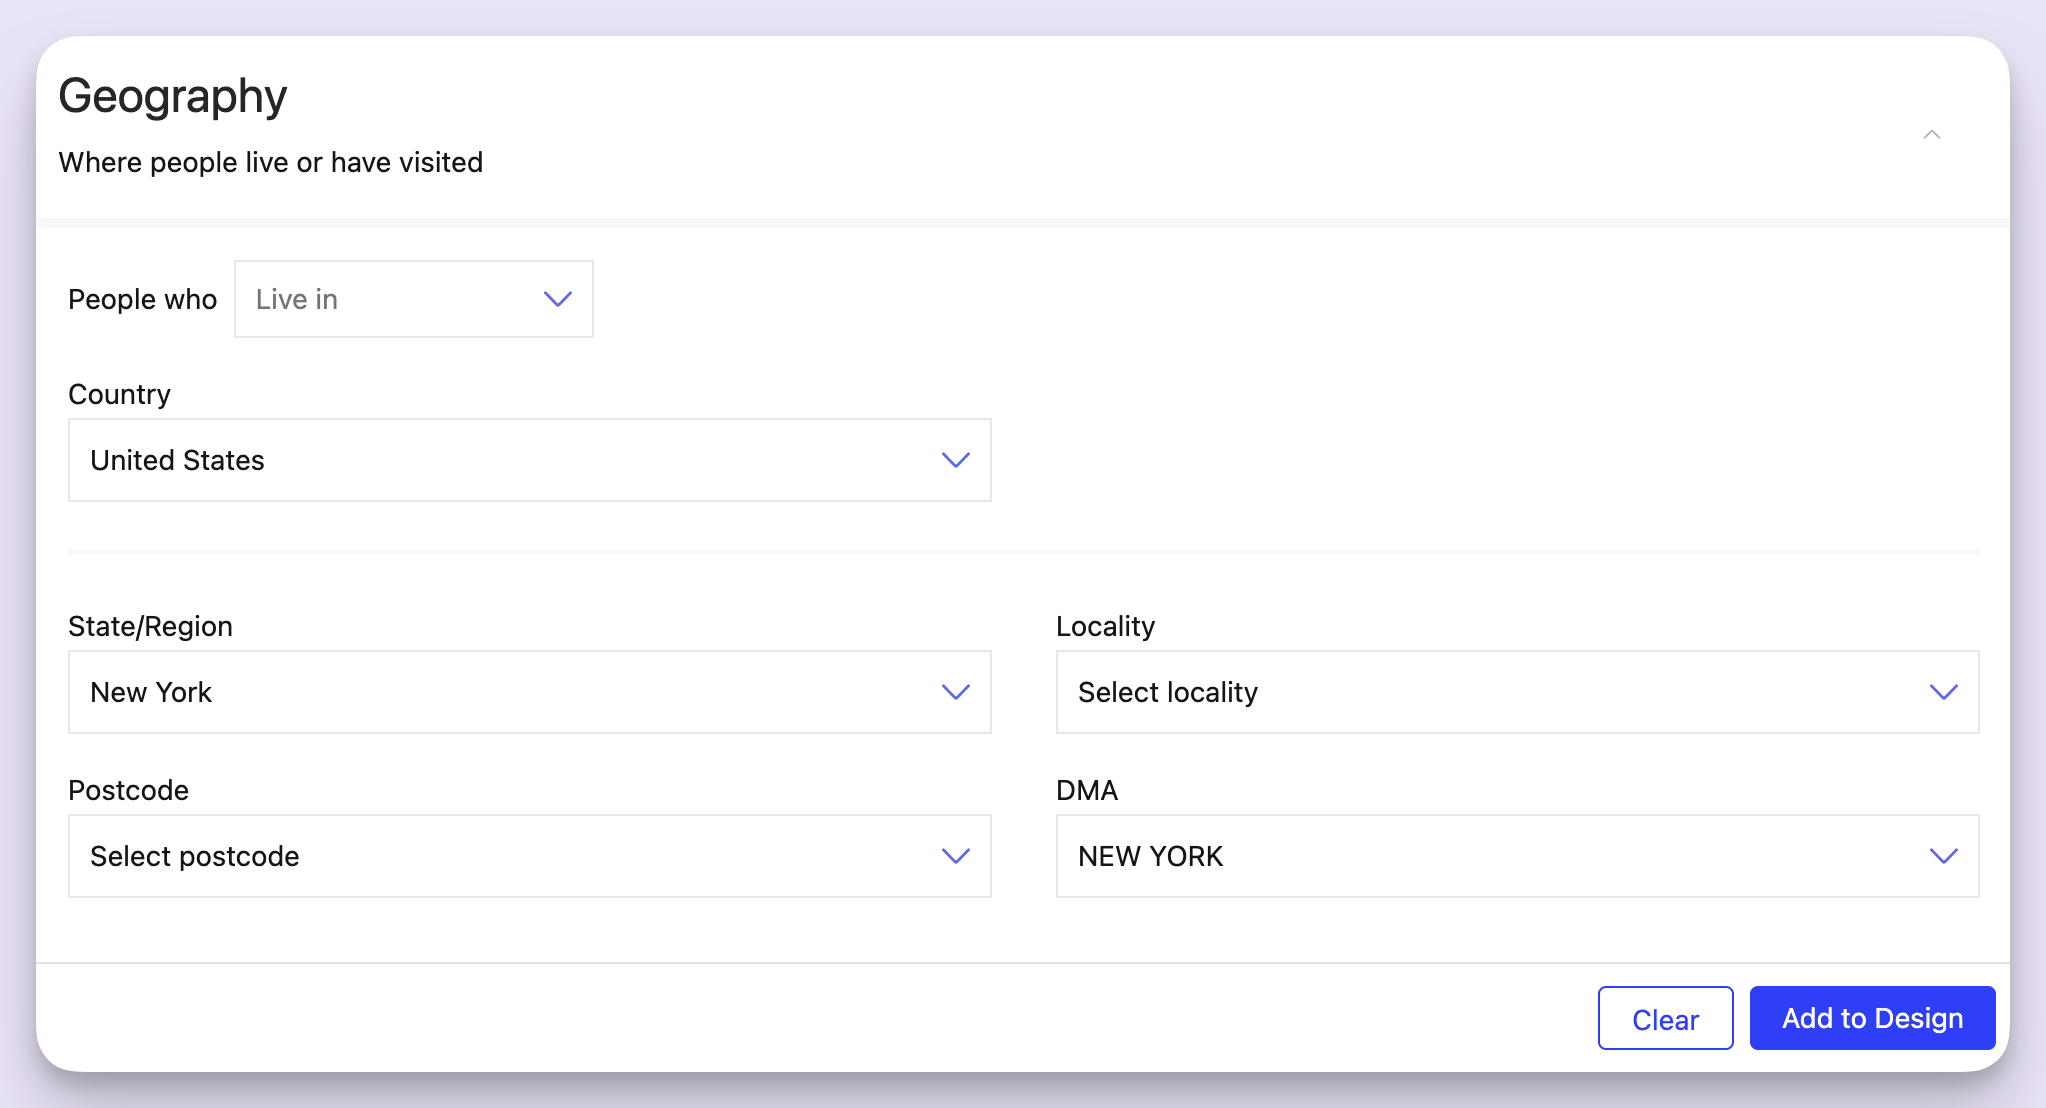
The Geography module, filtering for only those who live in New York.
While you can and should define your audience's location targeting in the Behaviors section, can add another layer of context.
For example, your audience may have been defined as having an interest in Florida theme parks, via visitation targeting and ready-to-use audiences. In the Geography section, we can now refine that audience further, choosing to include only those who live in certain states, have not visited certain zip codes, etc.
Click Clear to reset your selections, or click Add to Design to add it to your audience.
Options
The following options are available in the Geography module:
| Option | Description |
|---|---|
| People who | Defines the audience's relationship with the location. Includes people who live In, Do not live in, have visited, or have not visited the given location. |
| State/region | The state, or region, of the given country. |
| Locality | The locality, often pertaining to a city or town. |
| Postcode | The postcode, defined by the country's local post code system. |
| DMA | The Designated Market Area (DMA). US Only. |
Demographics
The Demographics module allows you to select/exclude demographic options, where available. Including gender, age range, and if they are a parent.

The demographics module in Foursquare Audience.
For example, if your segment audience is for luxury female fashion, you may wish to select the appropriate age range and income for the target audience.
Select as many options as you wish. Click Clear to reset your selections, or click Add to Design to to add it to your audience.
Options
The following options are available in the demographics module:
| Option | Description |
|---|---|
| People who | Defines the audience's relationship with the following demographic parameters. Two options are available: People who have characters, and people who do not have characteristics. |
| Gender | The gender of the audience. Options include all genders, male, or female. |
| Parent | Parental status, either mom or dad. |
| Incomes | The income bracket of the audience. A number of options are available in $25k intervals. |
Audience Estimate & Settings
As you update your Audience via any of the aforementioned modules, you may notice that you Audience Estimate progressively changes with an estimate of devices.
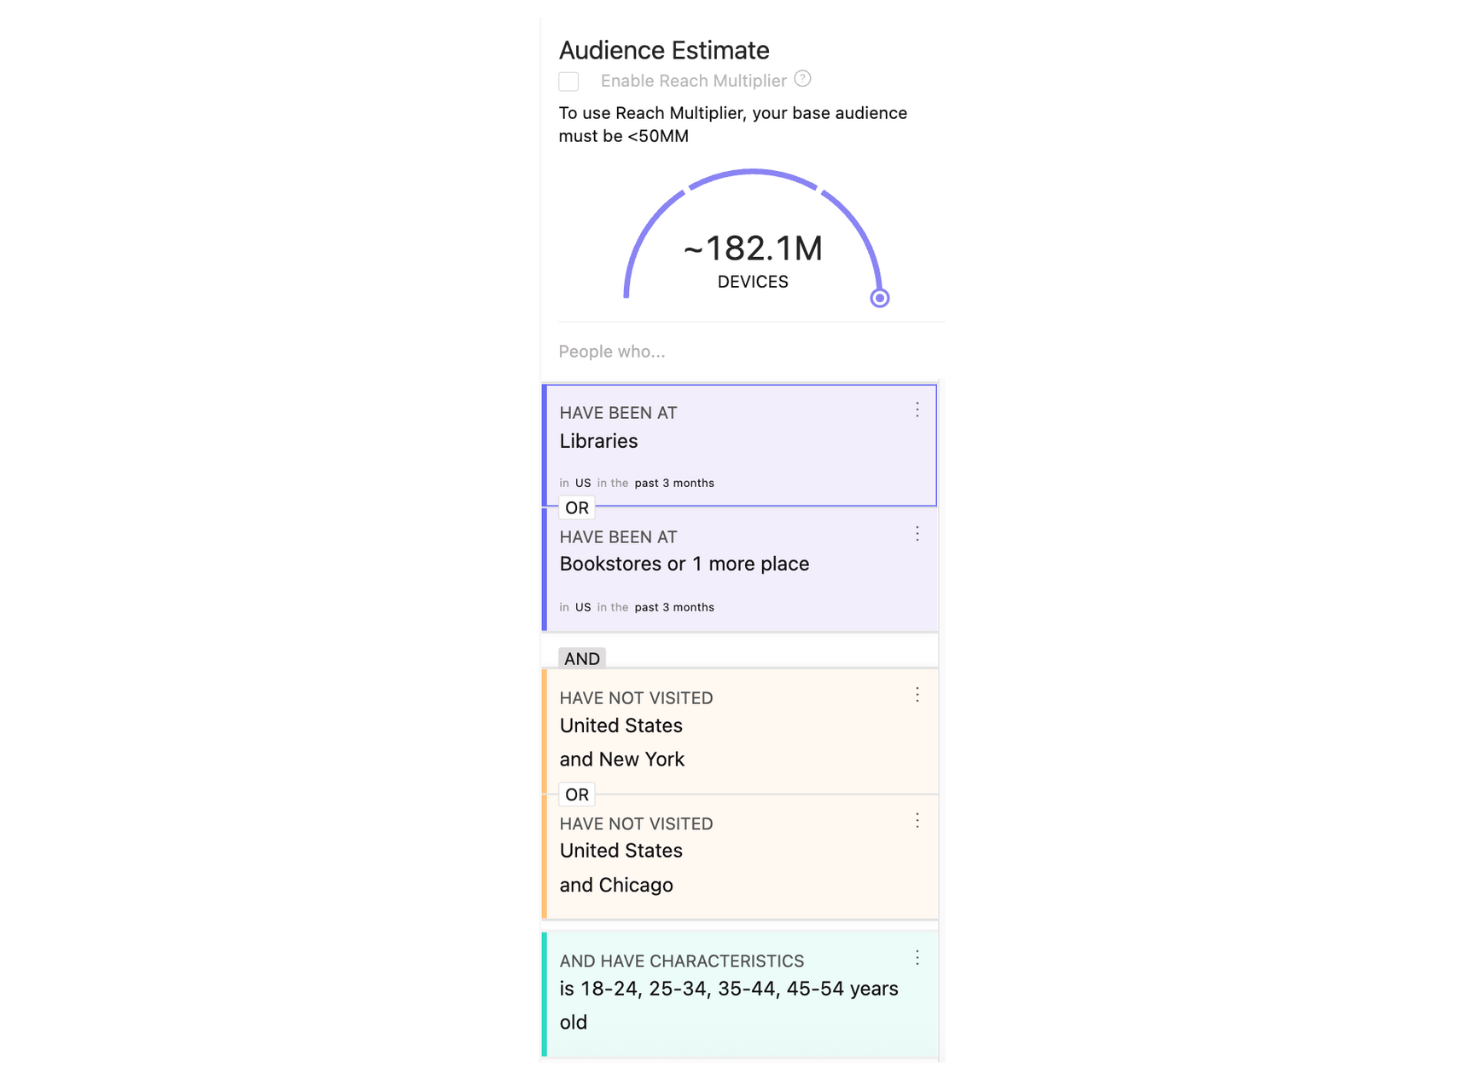
Audience Estimate with Settings
Reach Multiplier
Enable Reach Multiplier to expand your audience, increasing the scale by adding similar devices. These devices are modeled from the audience you created.
Reach Multiplier is useful if you think that you might be leaving some groups out, or the segment gains more from reaching more people rather than being hyper-accurate. However, if your goal is absolute accuracy, you may opt to keep reach multiplier disabled.
Audience must be between 50k and 50mTo use reach multiplier, your audience must be between 50,000 and 50,000,000 devices.
Apply Logic (And/Or)
You can apply simple logic statements to your Audience via dragging and dropping items on top of each other.
When you drop an item on top of another item, the two are combined in an AND... OR statement. For example, if we have two items targeting people who have not visited New York or Chicago, we can combine them to include those who have not visited New York, and have not visited Chicago.

Logic can be applied across modulesYou can apply logic between the Behaviors, Geography, and Demographics, modules.
Edit
To edit an item, simply click to open the configuration menu. Upon completing your edits, click Update to return to apply your changes to the audience.
Duplicate → EditIf you want to make a similar item to one that you have already created, you can duplicate your item, make any changes, then click Update to add the item to your audience!
Duplicate
If you wish to make a copy/duplicate an item, click the three dots (⋮) beside the item you wish to duplicate, then click Duplicate.
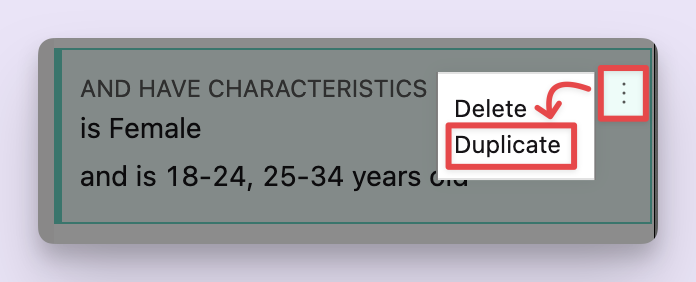
Duplicating an item in Audience Designer.
Delete
If you made a mistake, click the three dots (⋮) beside the item you wish to delete, then click Delete.
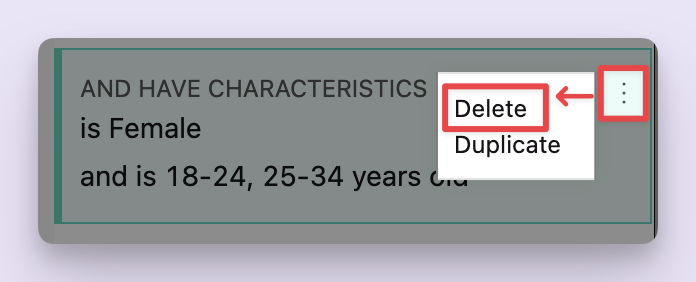
Deleting an item in Audience Designer.
Save
Click Save to store your progress on your Foursquare account. This will not build your project, but instead save it in your My Designs page.
If you do not see the Save button, ensure that:
- Your design has a Name and Targeting Code (See table above).
- Your design is not empty.
When you are ready to continue editing the saved design, simply click on its name on the My Designs page.
Build
When you're finished designing your segment, you can click Build to be redirected to the My Designs page. Here, you can fill in the final details to build your segment.
You'll be asked to fill out a brief form indicating your impression target, your campaign start/end date, as well as the DSPs to which you intend to deploy the segment.
After completing the form, you'll be notified of updates on the deployment process either through email when deploying to a self-serve platform, or through the ticket you'll open in our customer support portal when deploying to a non-self-serve platform. See the list of Eligible Platforms here.
For more information about deploying your segment, please visit the Deploying Segments to DSP page. Deploying a segment is the same process for both Audience and Proximity products.
Still have questions?Visit our customer support portal for further support.
How's your experience with Foursquare Audience?We'd love your feedback! Share your experience by leaving us a review on G2.
Updated 4 months ago