
Build a Proximity Segment
Welcome to our full guide for creating a segment in the Proximity Designer tool. While this guide offers a full look into Foursquare's Proximity Designer, be sure to use the sidebar to jump to relevant sections.
Account required!Building a Proximity segment requires an account. If you do not have an account, visit our customer support portal for further support.
Create a New Design
Before we can begin designing our segment, we must initialize the project.
- Go to the Proximity tab at targeting.foursquare.com. A new set, or group of places, is initialized.
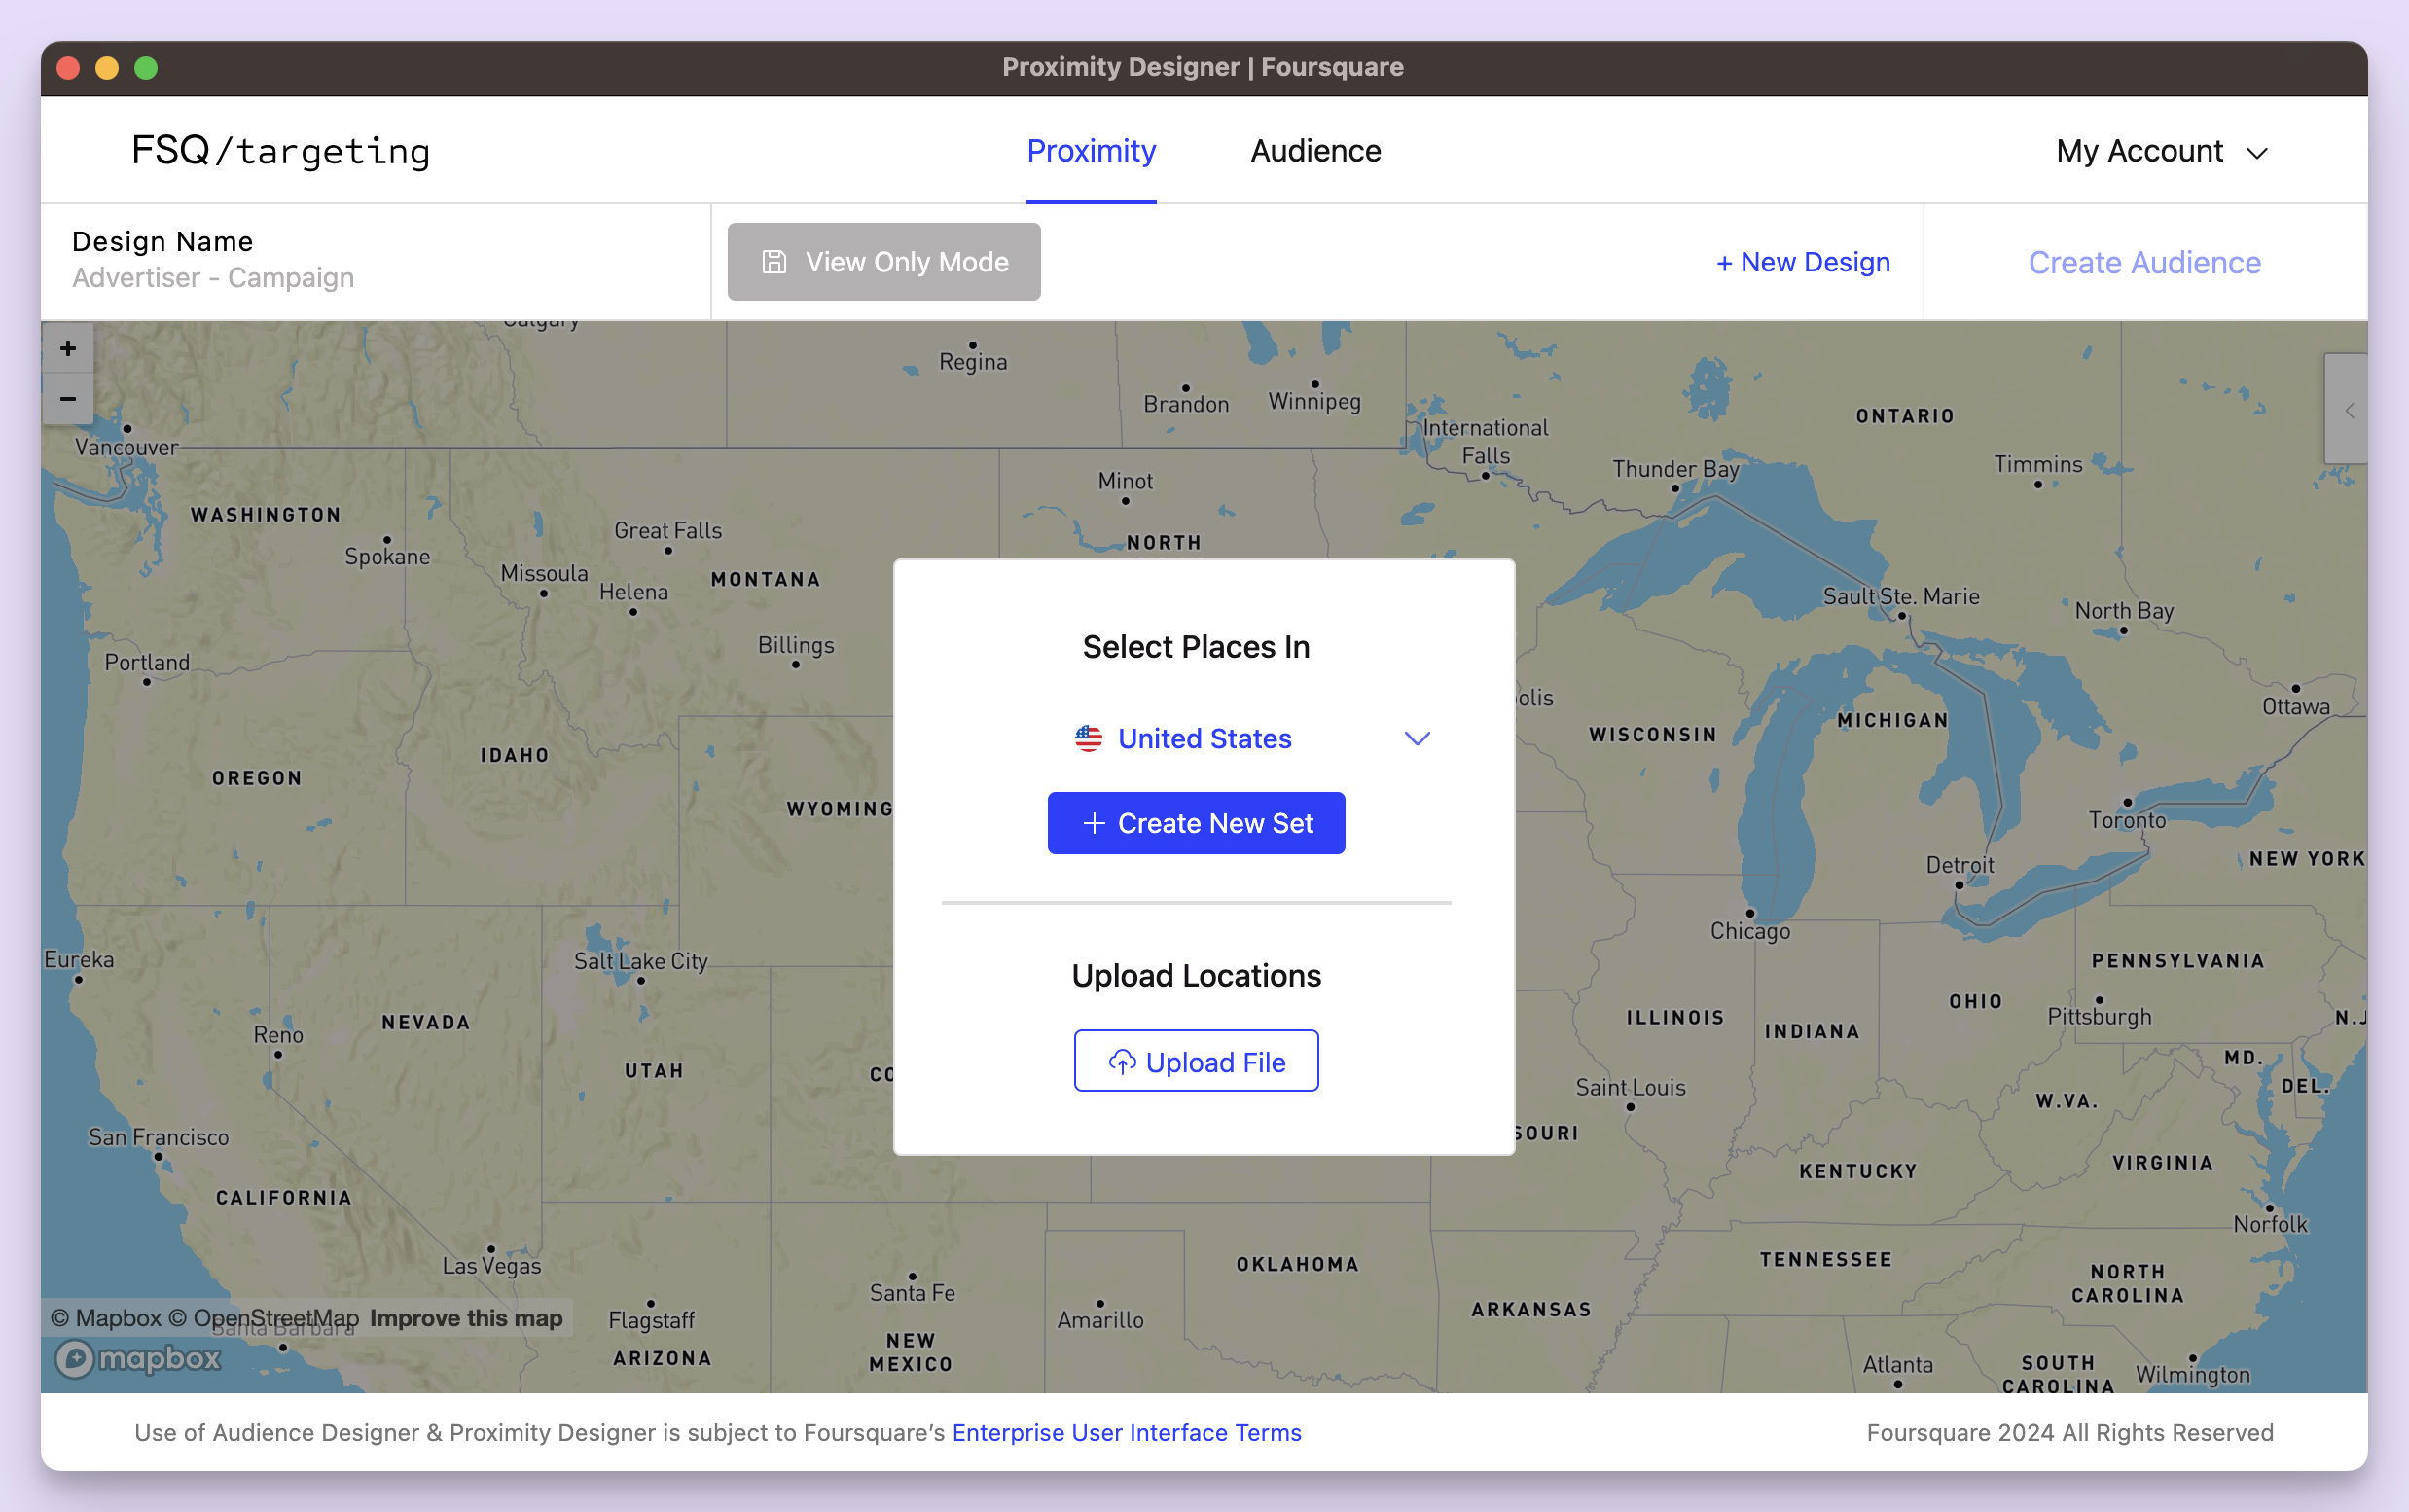
Initializing a Proximity design.
There are two options for adding a set:
- Create New Set: Create a new Proximity set for your selected country, selecting locations with the Proximity designer. This guide closely follows this method of adding sets, so we will select this option for this guide.
- Upload Locations: Upload your own dataset, either a set of latitude/longitude coordinates for specific locations (
.csv,.tsvor Excel files) or a set of polygons (.wktor.geojson). Learn more about formatting your file uploads.
You can mix and match these options, creating news sets via the Proximity designer (as shown below), as well as uploading files.
What is a "Set" in Proximity?A set is a collection of places (specific locations, chains, or categories), optionally with a group of shared filters applied.
For instance, a set can include a list of burger chains, with a filter to NYC. A different set can include a specific fast food chain.
- Fill in the three required fields: Design Name, Set Name, and Targeting Code.
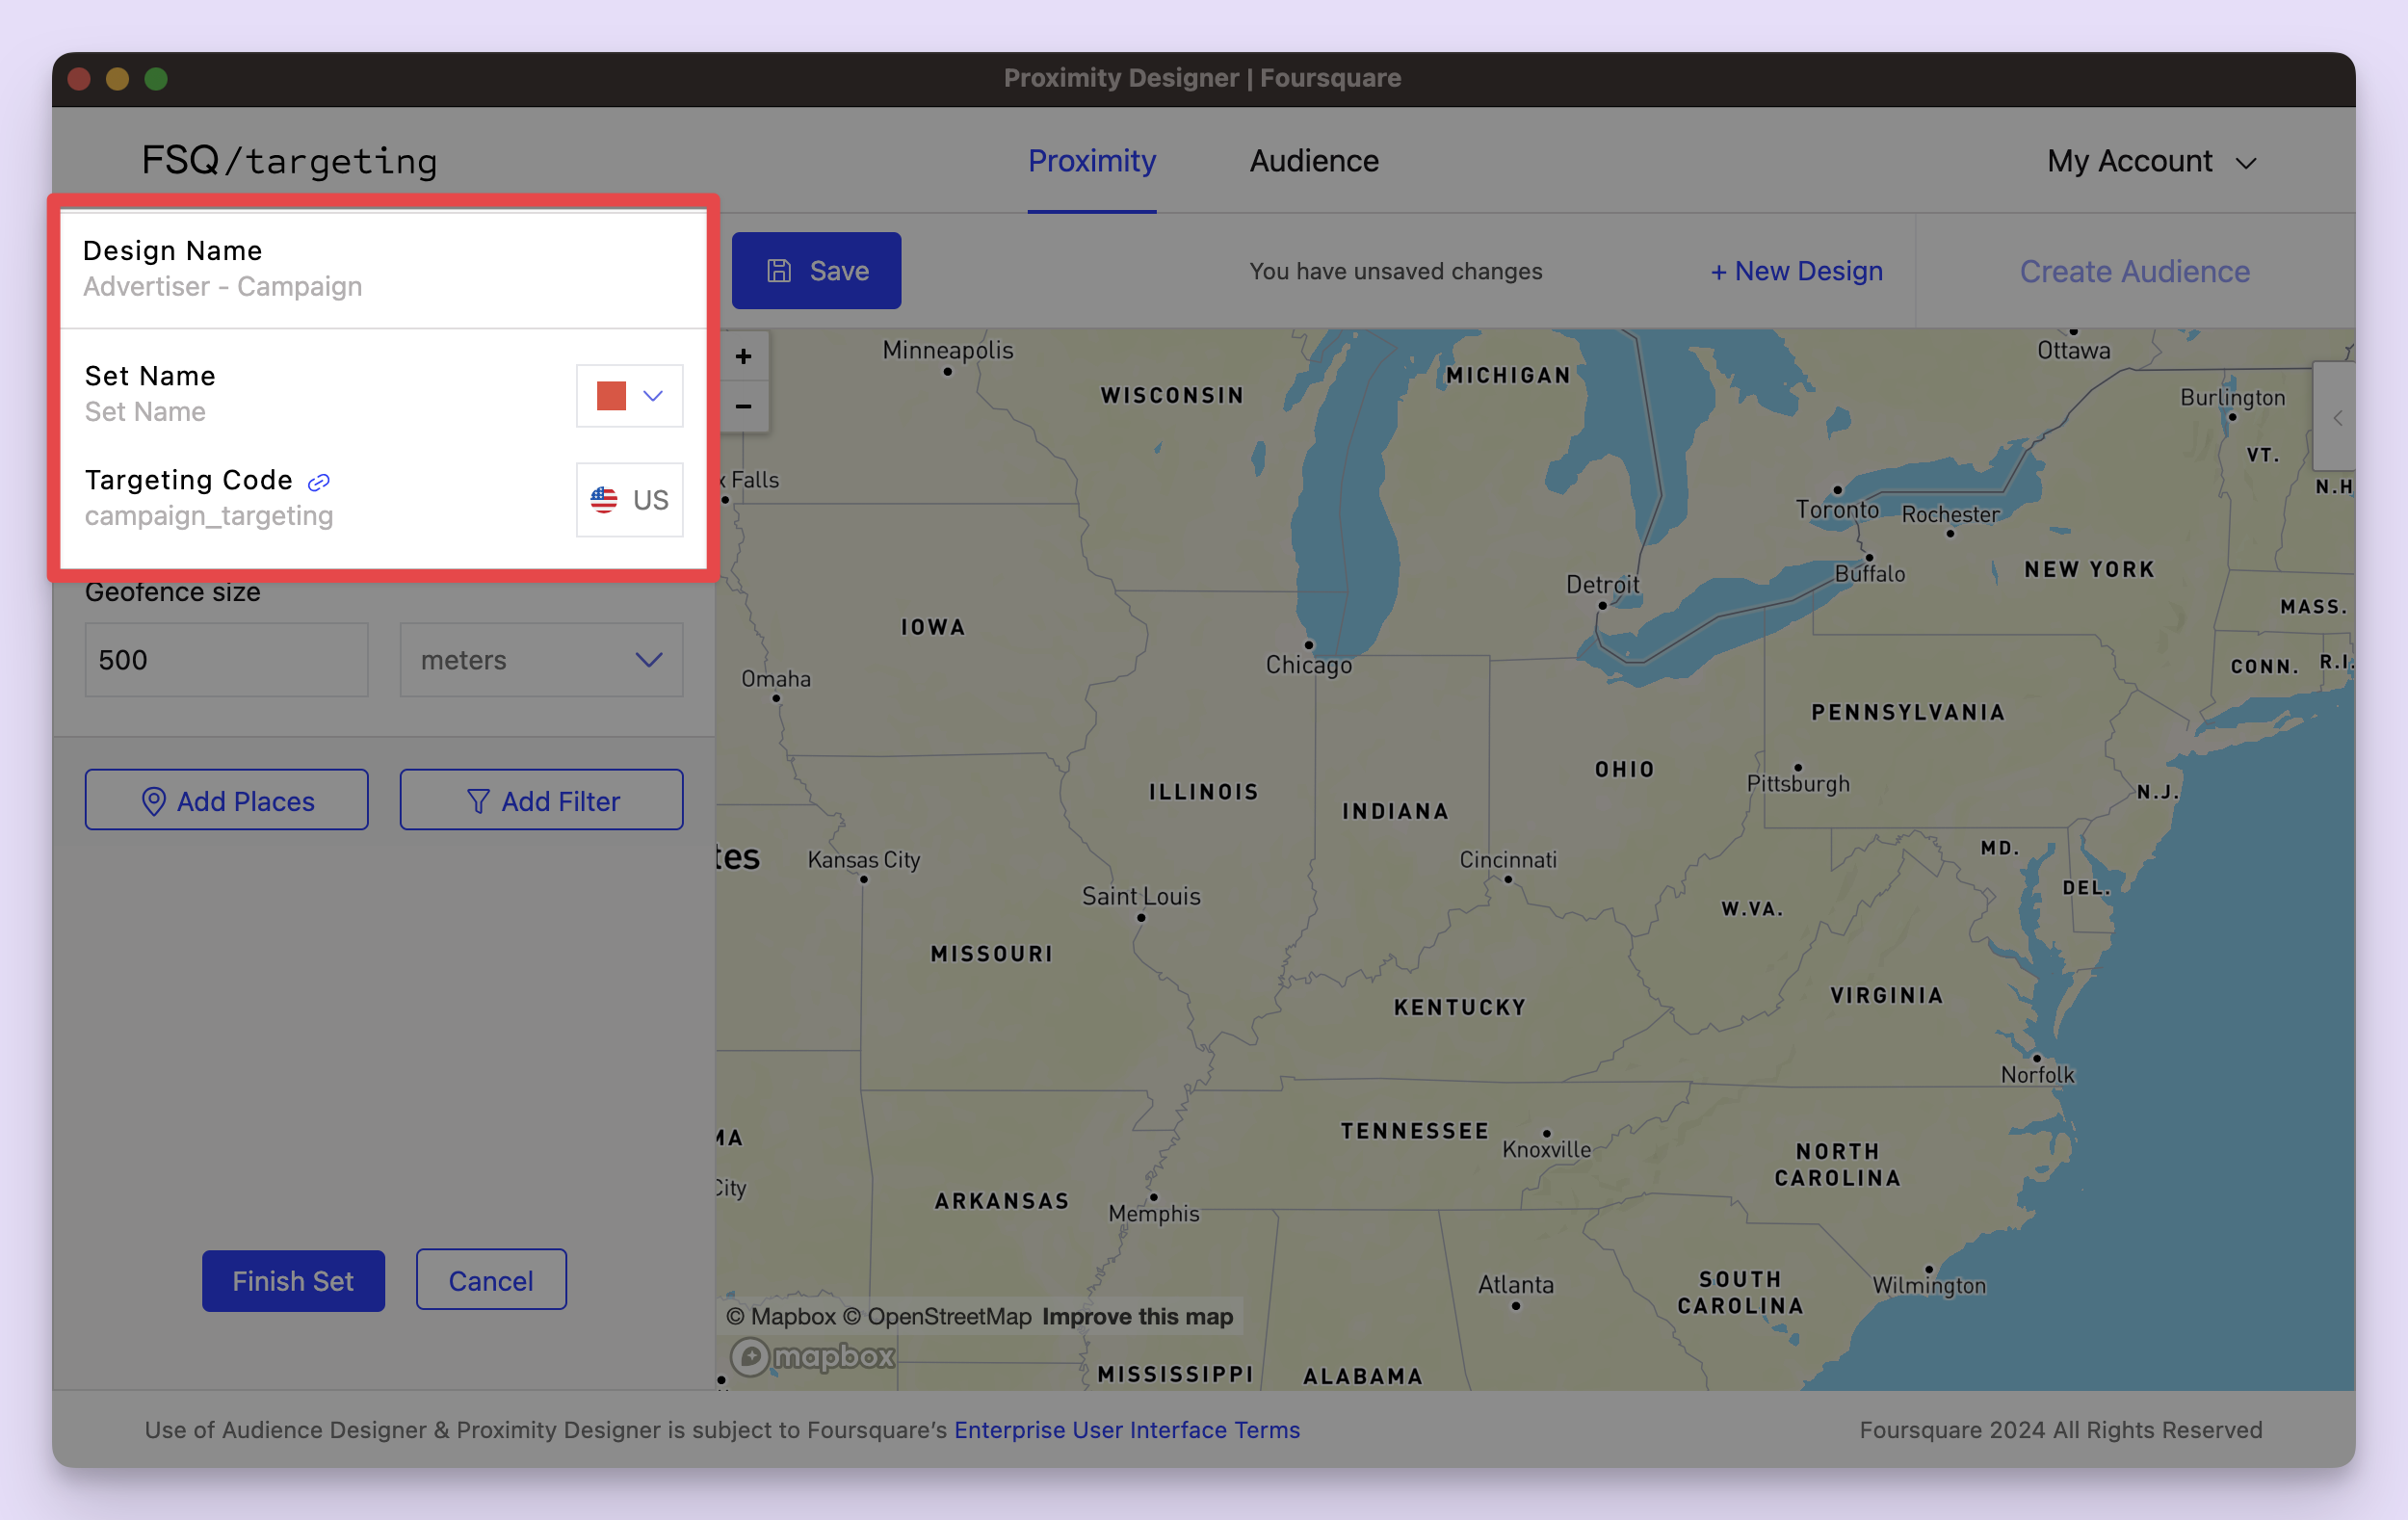
The Design Name, Set Name, and Targeting Code are required to save your design.
| Field | Description |
|---|---|
| Design Name | A name to give your Proximity design. This can be anything you want. It is used for your own reference within Foursquare Proximity. |
| Set Name | A name to give the selected set. As a best practice, we recommend following the same naming convention as the targeting code. You can click the chain icon to link these names together, ensuring they are the same. |
| Targeting Code | The ID you use to locate the segment within the DSP after deployment. Again, we recommend following the same naming convention for both the set name and targeting code. Click the chain icon to link these names. |
Basis DSP: Best PracticesIf you are building a segment to activate in Basis DSP, we recommend following the below naming convention for both Design Name and Targeting Code:
- BasisAdvertiserID_SegmentDetail_EndDateofCampaign
- For example, we had an advertiser ID
123456, a segment detail calledHighValueCustomers, with a campaign end date of2/29/2024, we would name the segment123456_HighValueCustomers_20240229.- Other DSPs do not have specific naming conventions, so you are free to name your segment however you’d like.
- Start designing a set by Adding Locations and Filters.
Now that the project is initialized, we can begin adding locations and filters to complete our sets.
Create a Set
A design consists of one or more sets, each containing a group of locations, chains, or categories.
Add Places
To add places to your set, click the Add Places button at the bottom of the set. A dialogue window will appear.
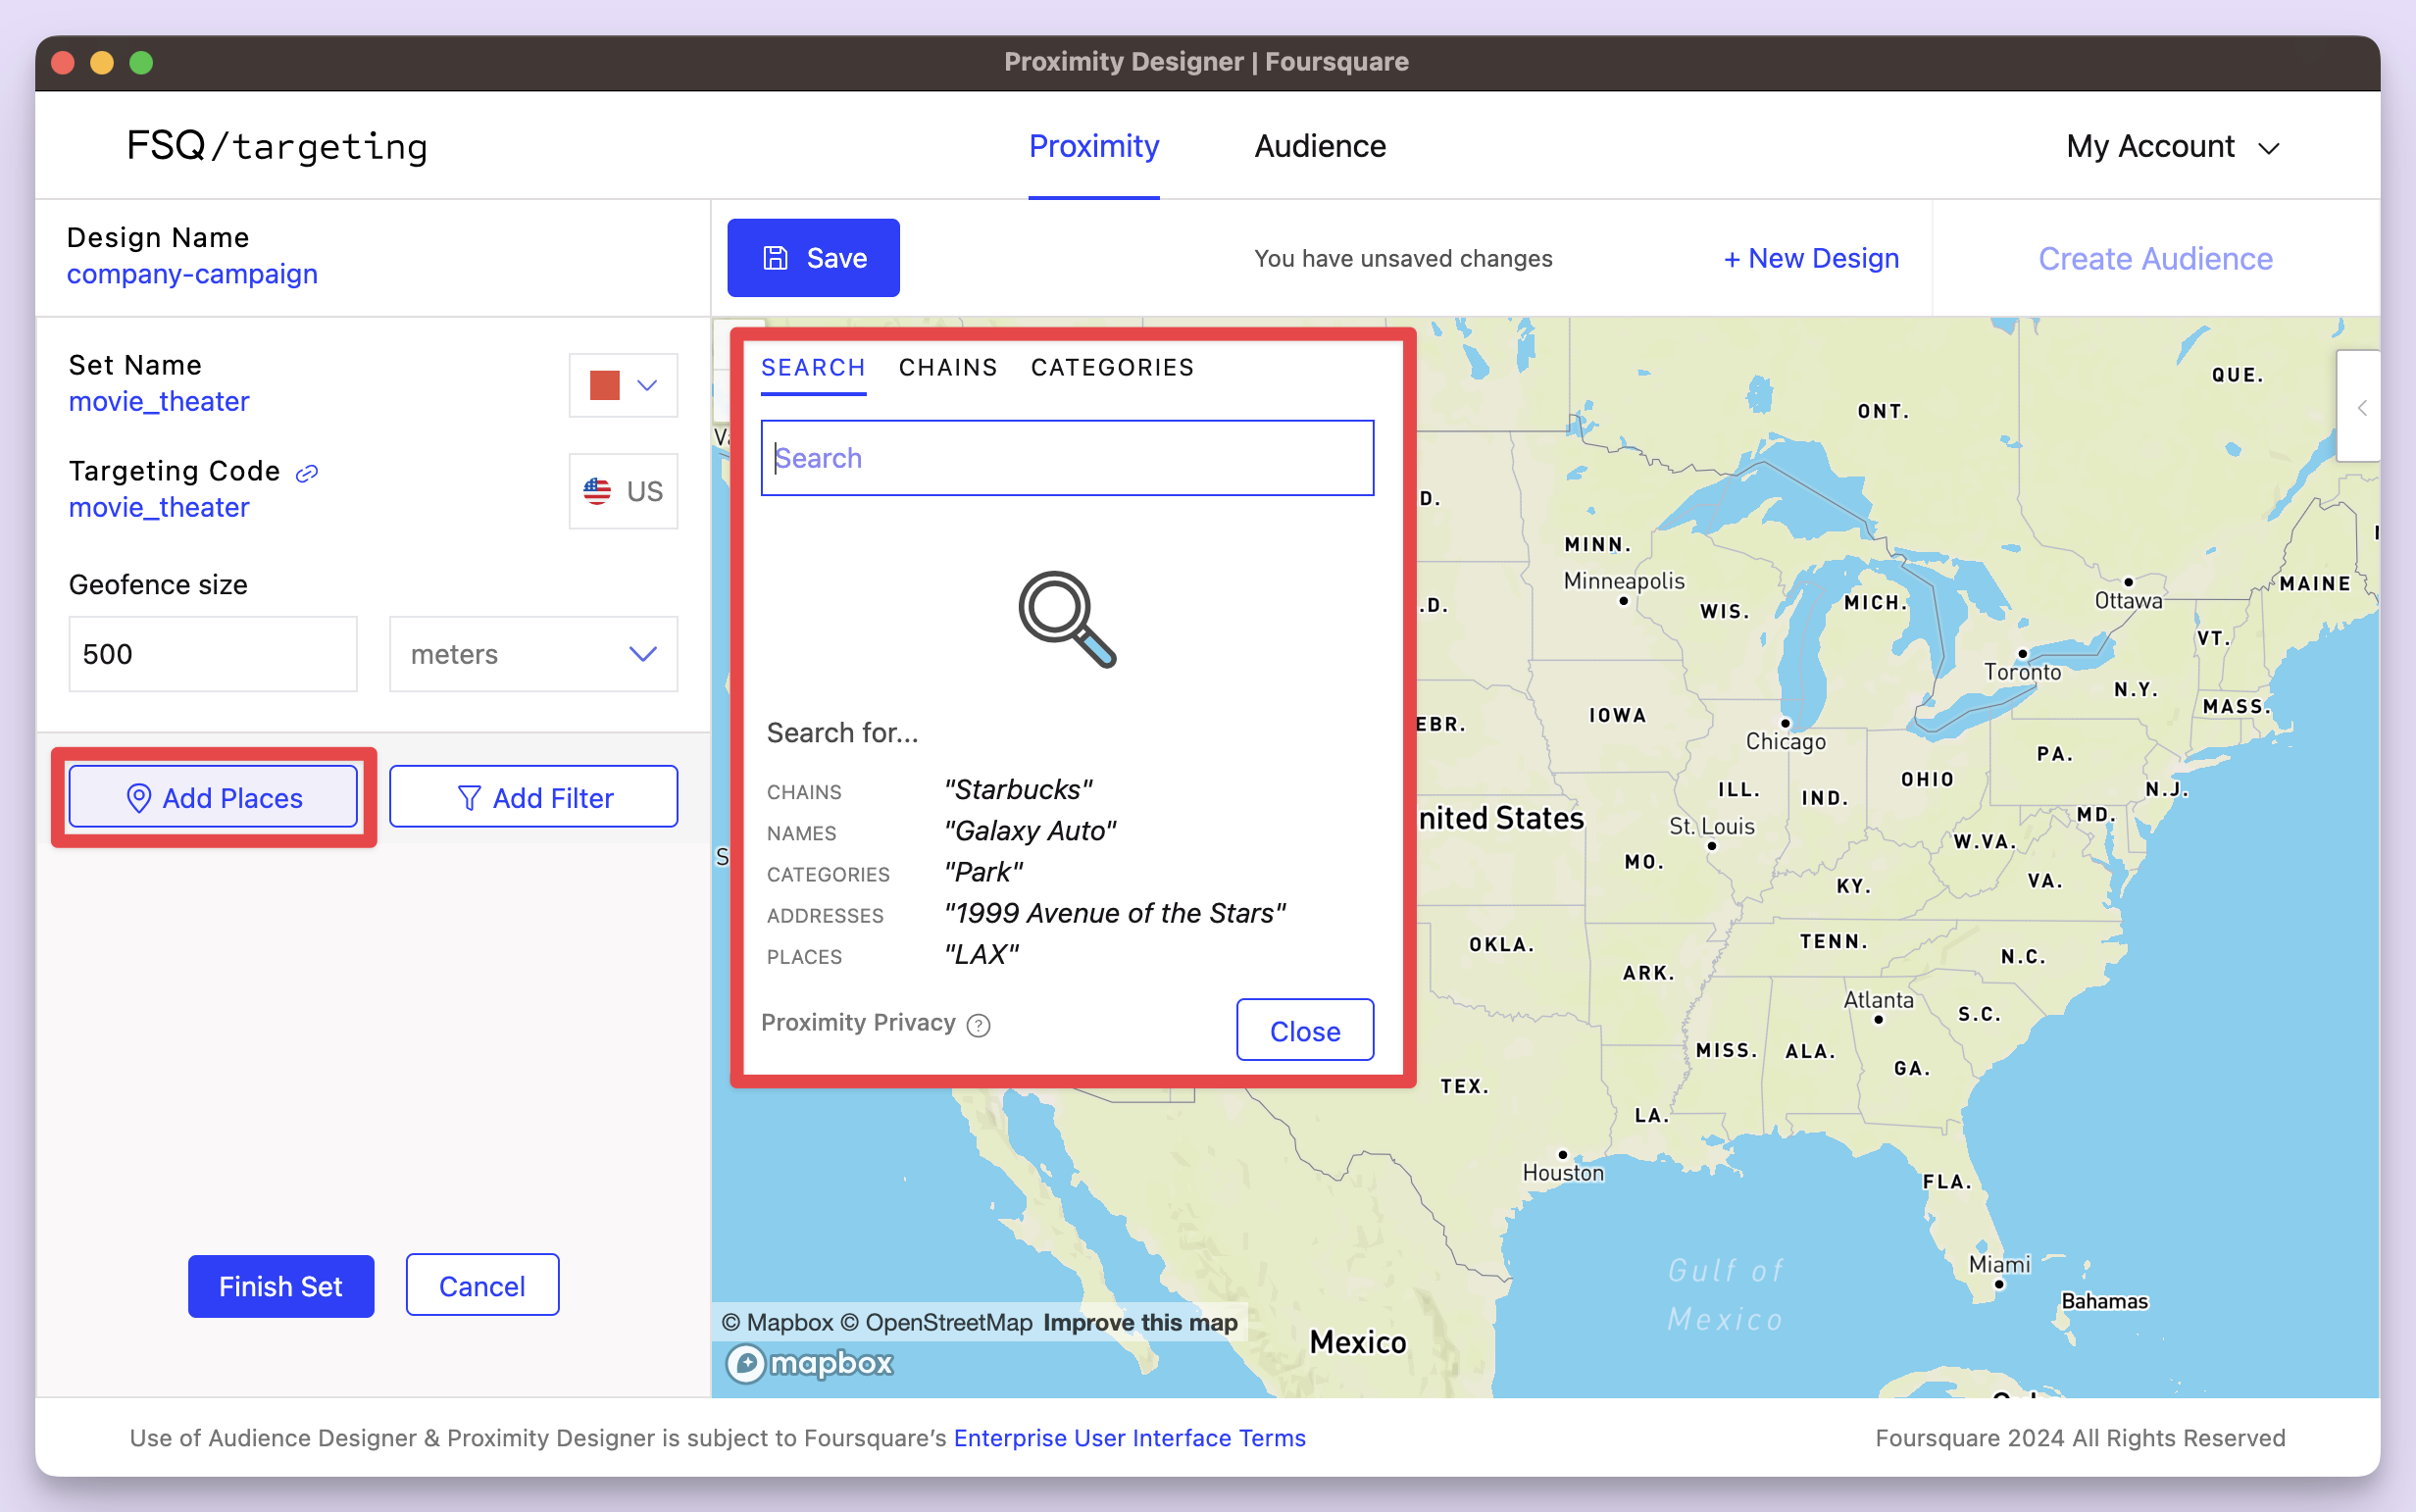
The Add Places button and modal.
There are three ways to select places for your set:
| Method | Description |
|---|---|
| Places | Search for any type of place, including chains (e.g. "Starbucks"), names (e.g. "Galaxy Auto"), categories (e.g. "Park"), addresses (e.g. "1999 Main Street"), or specific places (e.g. "LAX") |
| Chains | Select from chains Foursquare has indexed in the given country. Scroll through the list or use the search box to find a chain |
| Categories | Select from general categories and subcategories of businesses, such as "Fashion", or its subcategory "Shoes" |
Upon selecting places, they are immediately added to your design. A preview window appears on the right side of the screen, giving you a glimpse into the kind of places being selected.
In the below example, we have selected movie theaters as the category of places. On the right, we can see the number of locations added to the map.
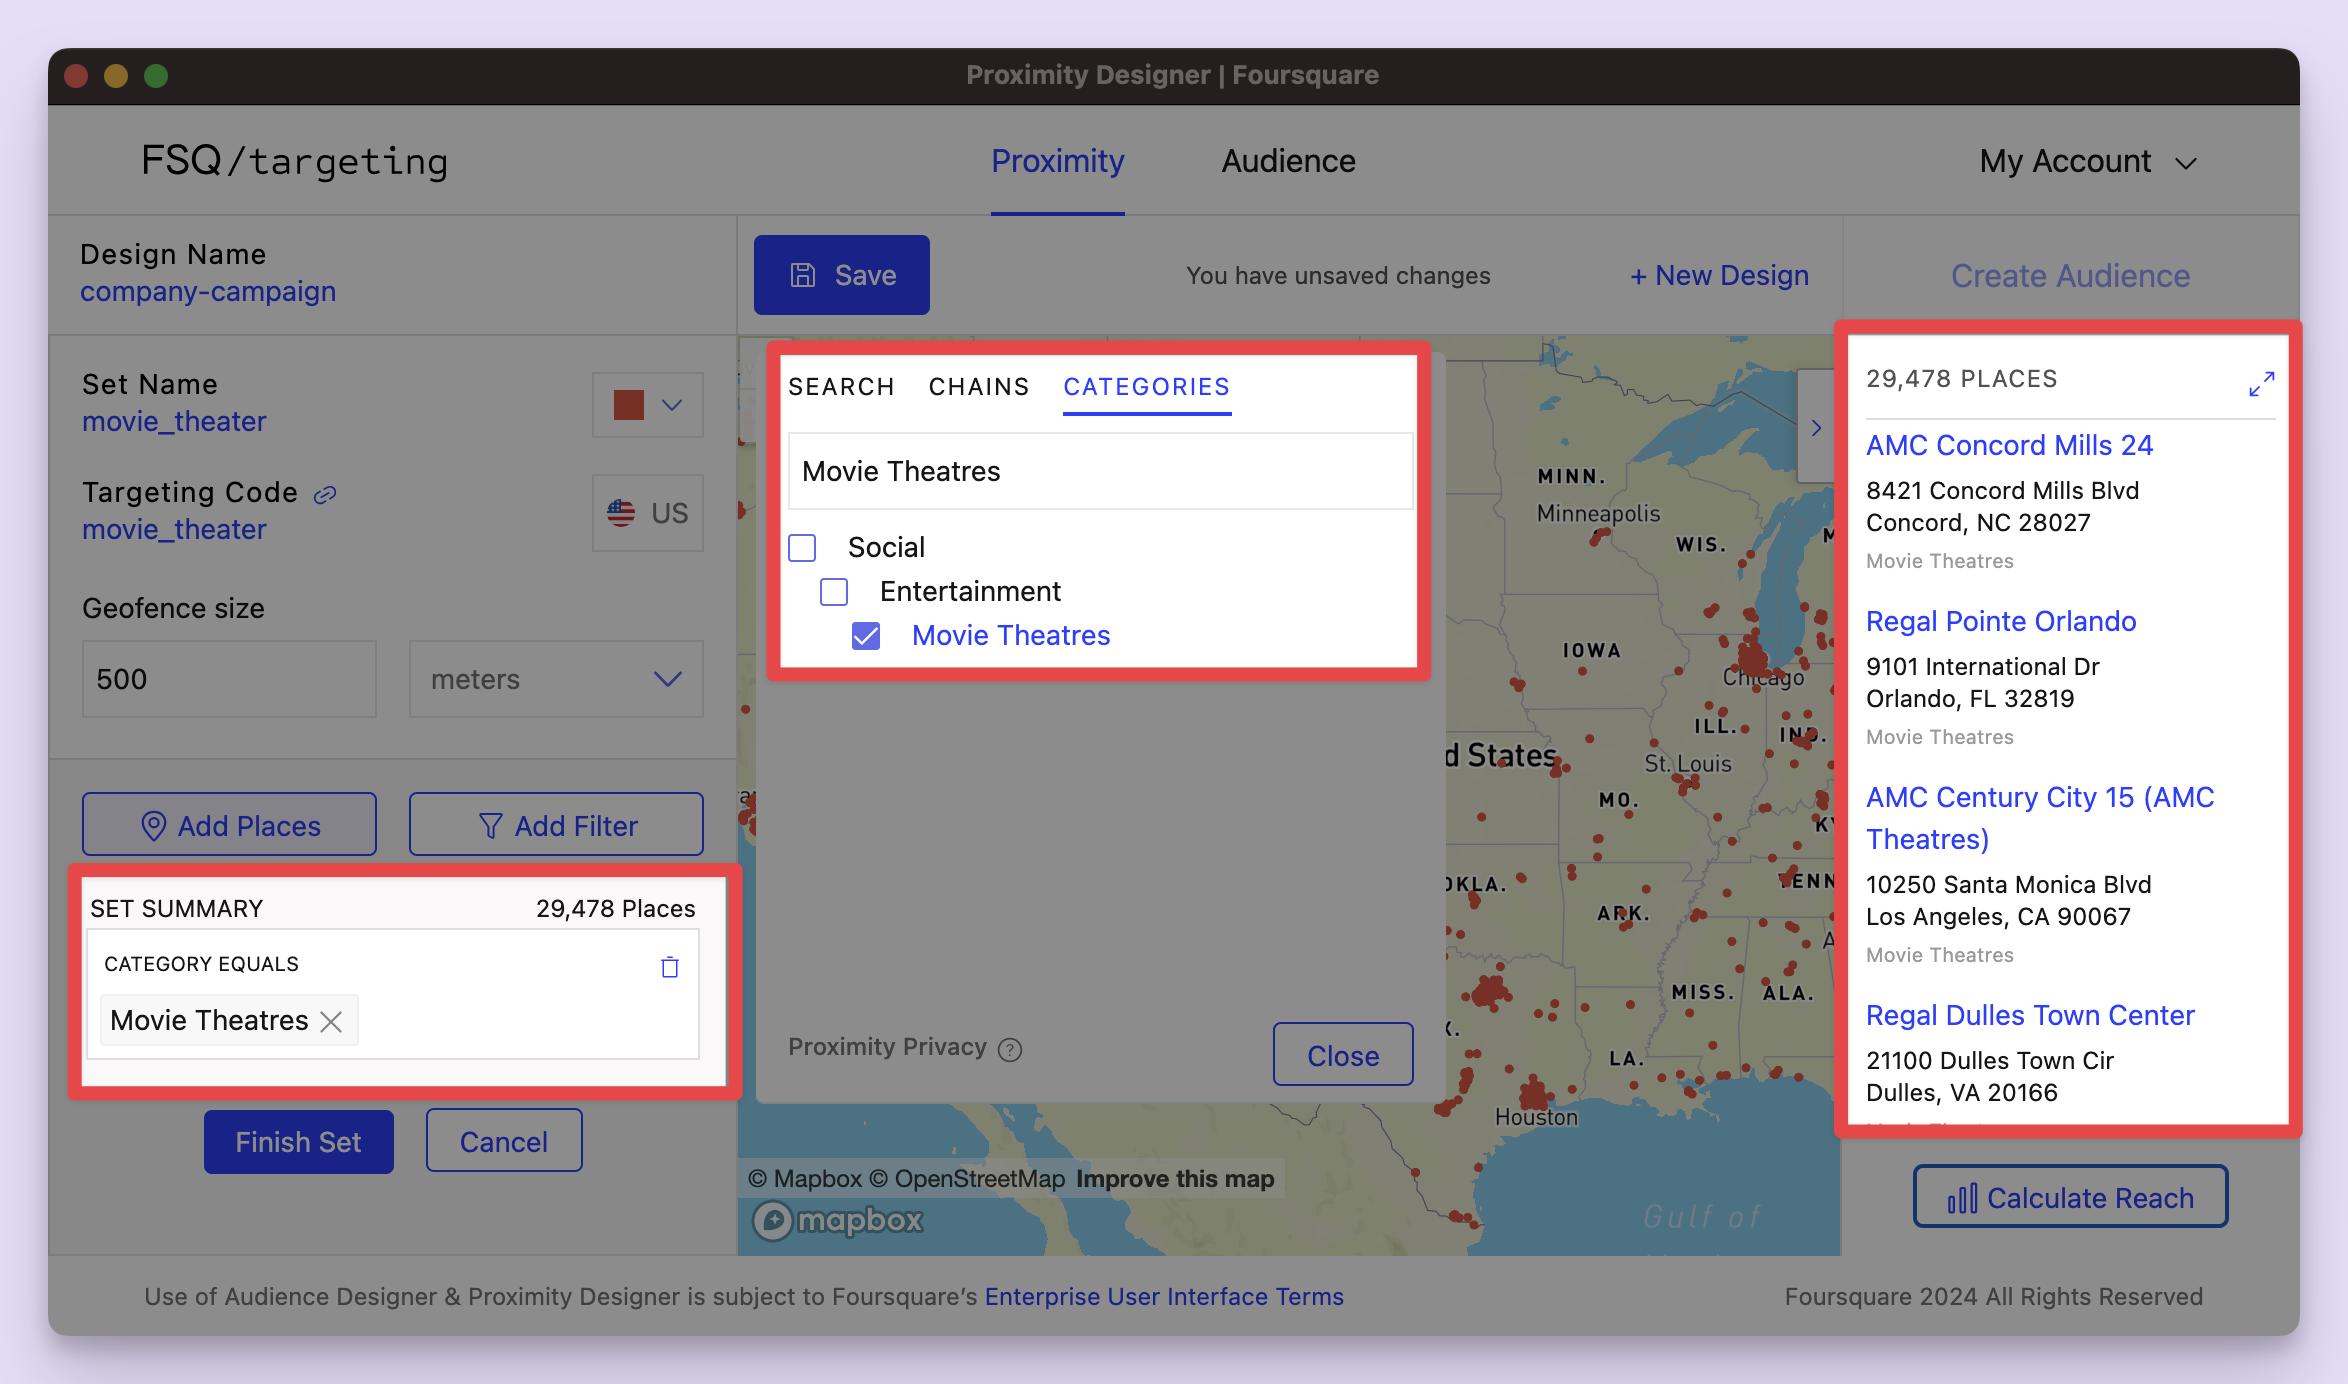
Selecting all movie theatres in the US in Foursquare Proximity.
Of course, campaigns may wish to focus on a certain area. Before we start filtering, we can explore the map. Click the Arrow Icon above the Places list to receive an updated count of the number of places available in the viewport, providing a good sense of coverage in any given area. In the below example, the viewport is centered on the Los Angeles area. Notice how the places list and count have been updated accordingly.
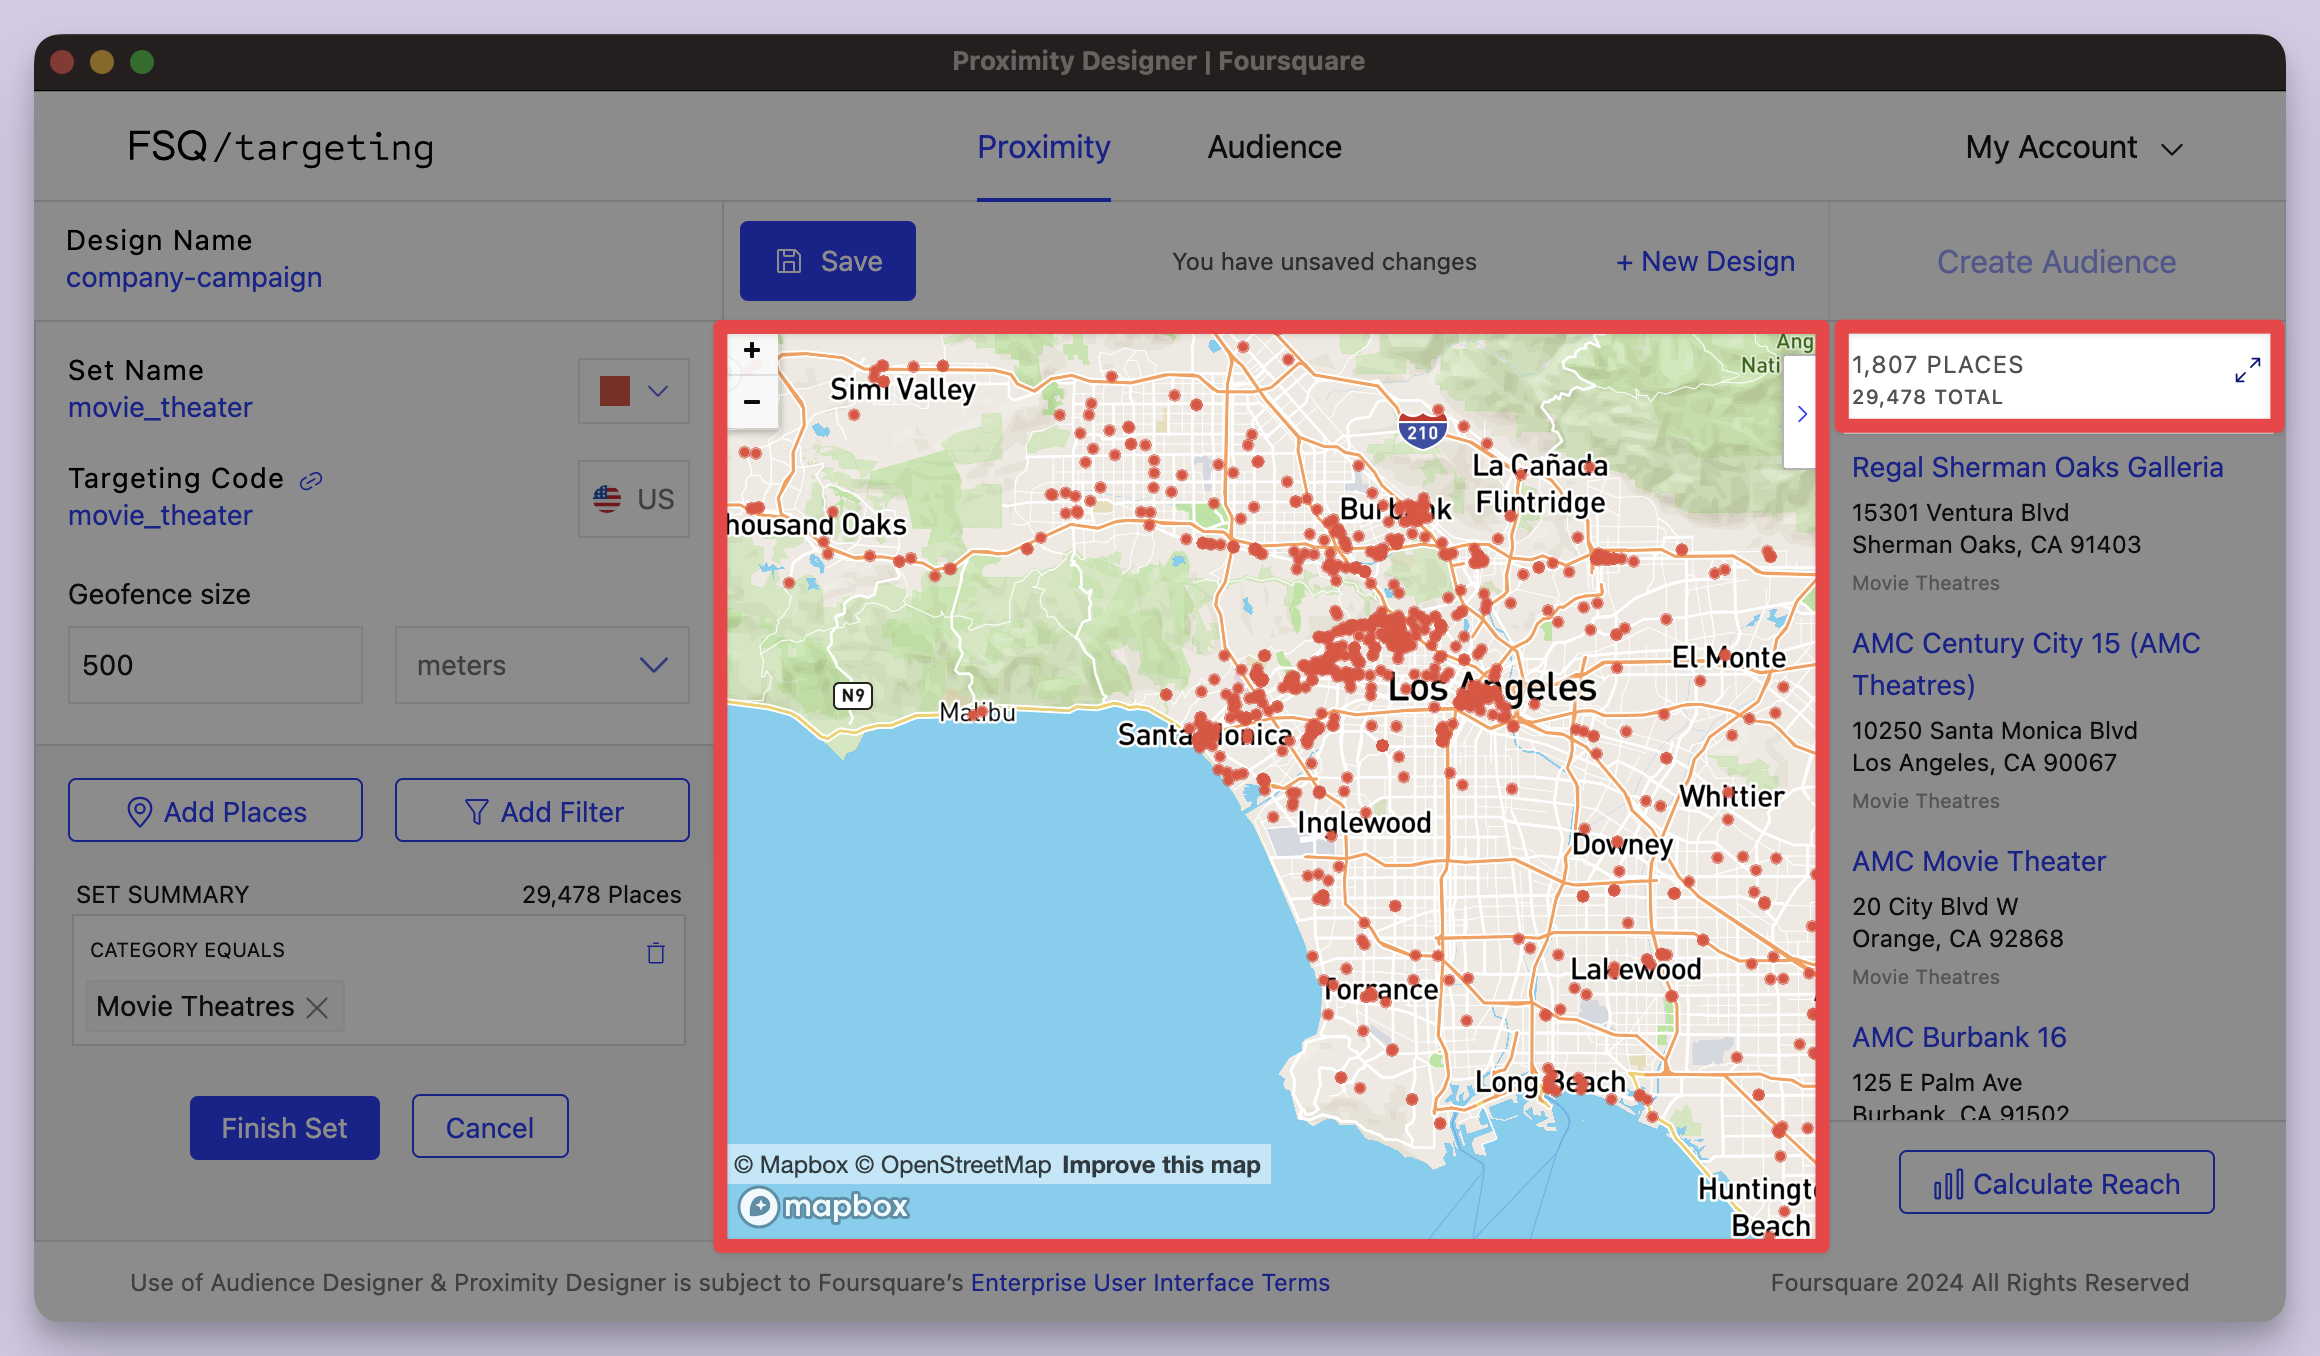
Viewport set to the Los Angeles area.
Using the interactive map provides insight into audience reach during the design process. Use the Calculate Reach feature at any time to directionally estimate the potential scale of this segment. Keep in mind that the reach of your segment may vary when activated in your desired platform.
However, to design our sets with more accuracy, including limiting our places to only a certain city, state, or DMA, we must use filters.
Create a Filter
After places have been added to the map, you can filter them by their Geo (location), Name, Category, or any other specification in Advanced.
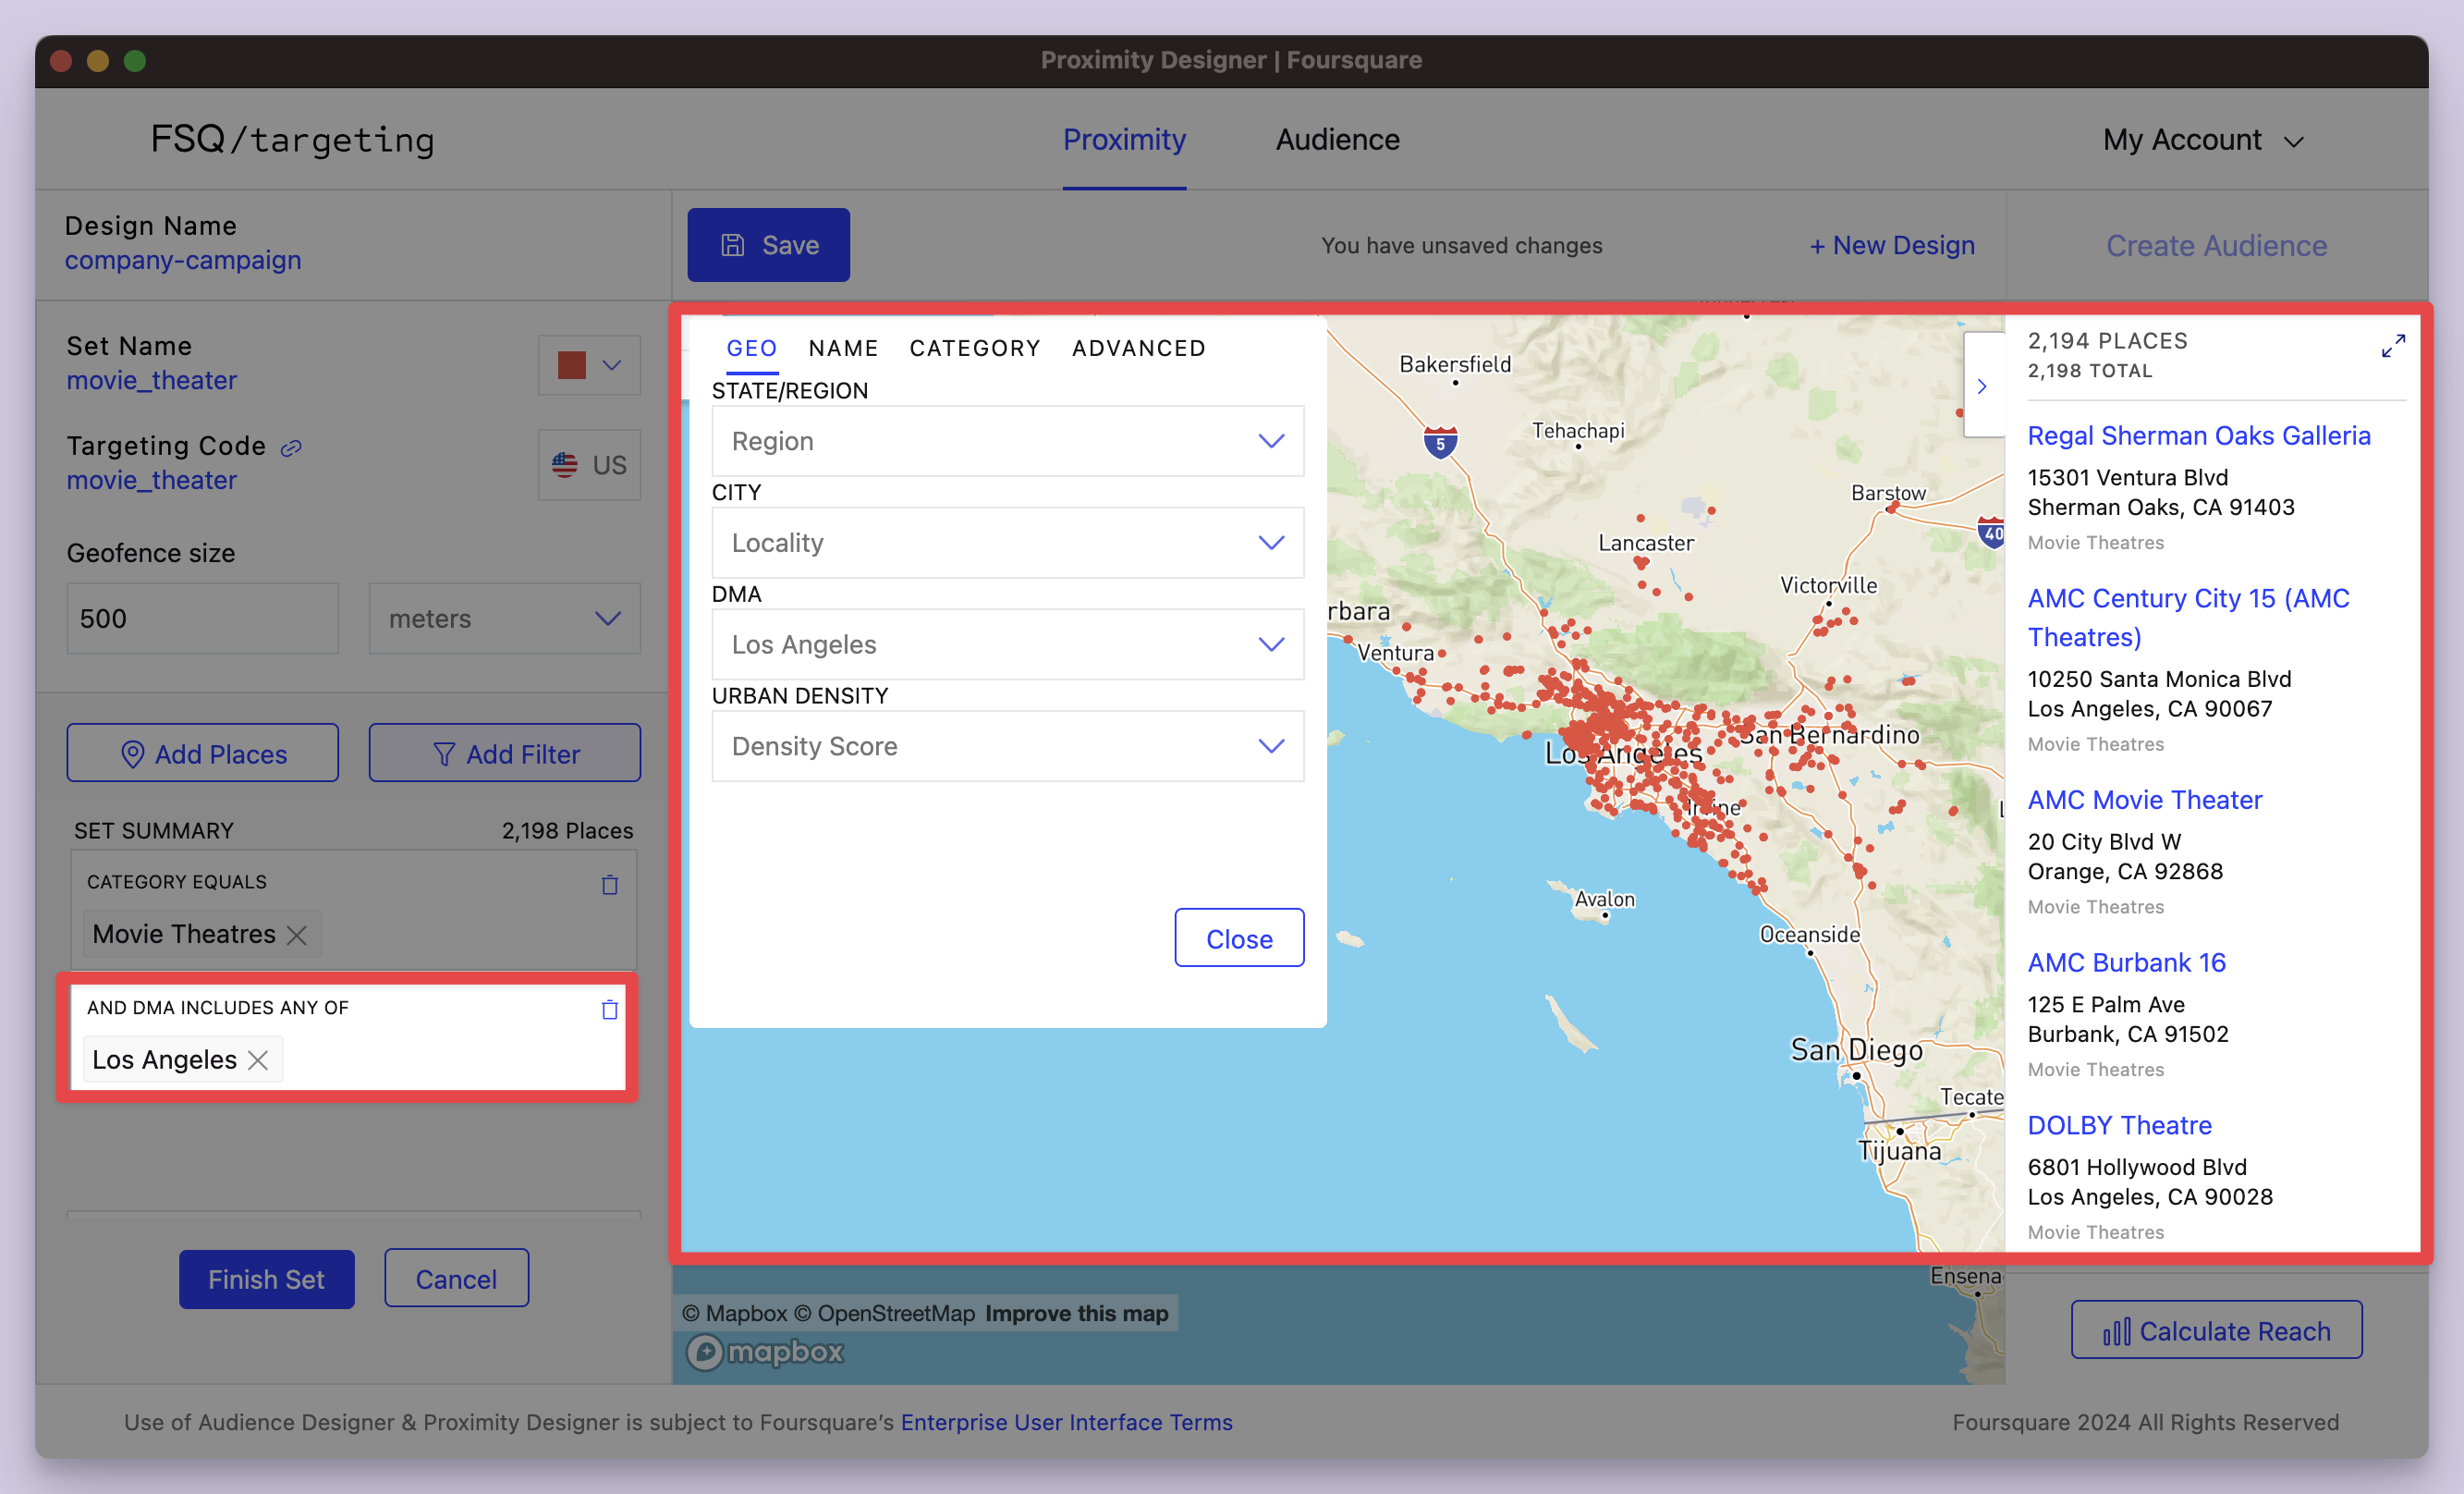
Filtering to only Movie Theatres in the Los Angeles DMA.
Geo
The Geo section contains the following options for location filtering:
Note: The following options vary by the selected country.
| Option | Description |
|---|---|
| State/Region | A state or region. |
| Locality | A locality, or metropolitan area. |
| DMA | Designated Marketing Area. Contains the DMA's number and city/town composition. US Only. |
| Urban Density | The urban density rating, including Low, Medium, and High. Low represents more rural areas and small towns, Medium represents suburbs and small cities (such as Madison, Wisconsin; Fresno, California; and Albany, NY), while High is for cities (Such as Los Angeles, Chicago, and New York). US Only. |
Name
Apply a filter to the name.
Simply enter text, then select Should contain if the locations should contain the given text, or Should not contain if the location should not contain the given text.
Category
Select only locations that are within the given category.
For example, if you are advertising consumer home improvement tools, you may wish to filter by Home Improvement >> Hardware Stores. This would filter many locations from your segment that may have made their way into the segment, such as contractor businesses or other undesired locations.
Advanced
WarningAdvanced settings are for users who have experience with Foursquare Proximity and other products. We recommend you do not apply any advanced filters unless you are certain about the content you are filtering.
Advanced settings allow you to filter on more of Foursquare's data elements. You can select whether the given field should, with respect to your segment's place:
- Begin with/Does not begin with the text,
- Contain/Does not contain the text,
- Equals/Does not equal the text.
The following advanced filtering options are available:
| Option | Description | Example |
|---|---|---|
| Address | The full address of a location. | 476 5th Ave, New York, NY, 10018, US |
| Category ID | Category ID string. | |
| Factual/Foursquare ID | Factual or Foursquare ID for the location. | 369265e7-817e-45e1-ad92-087424ee169b |
| Locality | The locality of the location. | New York |
| Name | A full name of the location. | New York Public Library |
| Post Code | A postal code for the location. | 10018 |
| Tel | The telephone number of the location. | (917) 275-6975 |
| Website | The URL for the location's website. | http://www.nypl.org |
Set Geofence Size
By default, Foursquare Proximity sets the geofence size to a 500-meter radius around the location. This should suit most standard locations well.
To increase your geofence, simply enter a new number and select a unit of measurement, from Meters, Miles, or Kilometers. The geofence is updated visually on the map (see the example below).
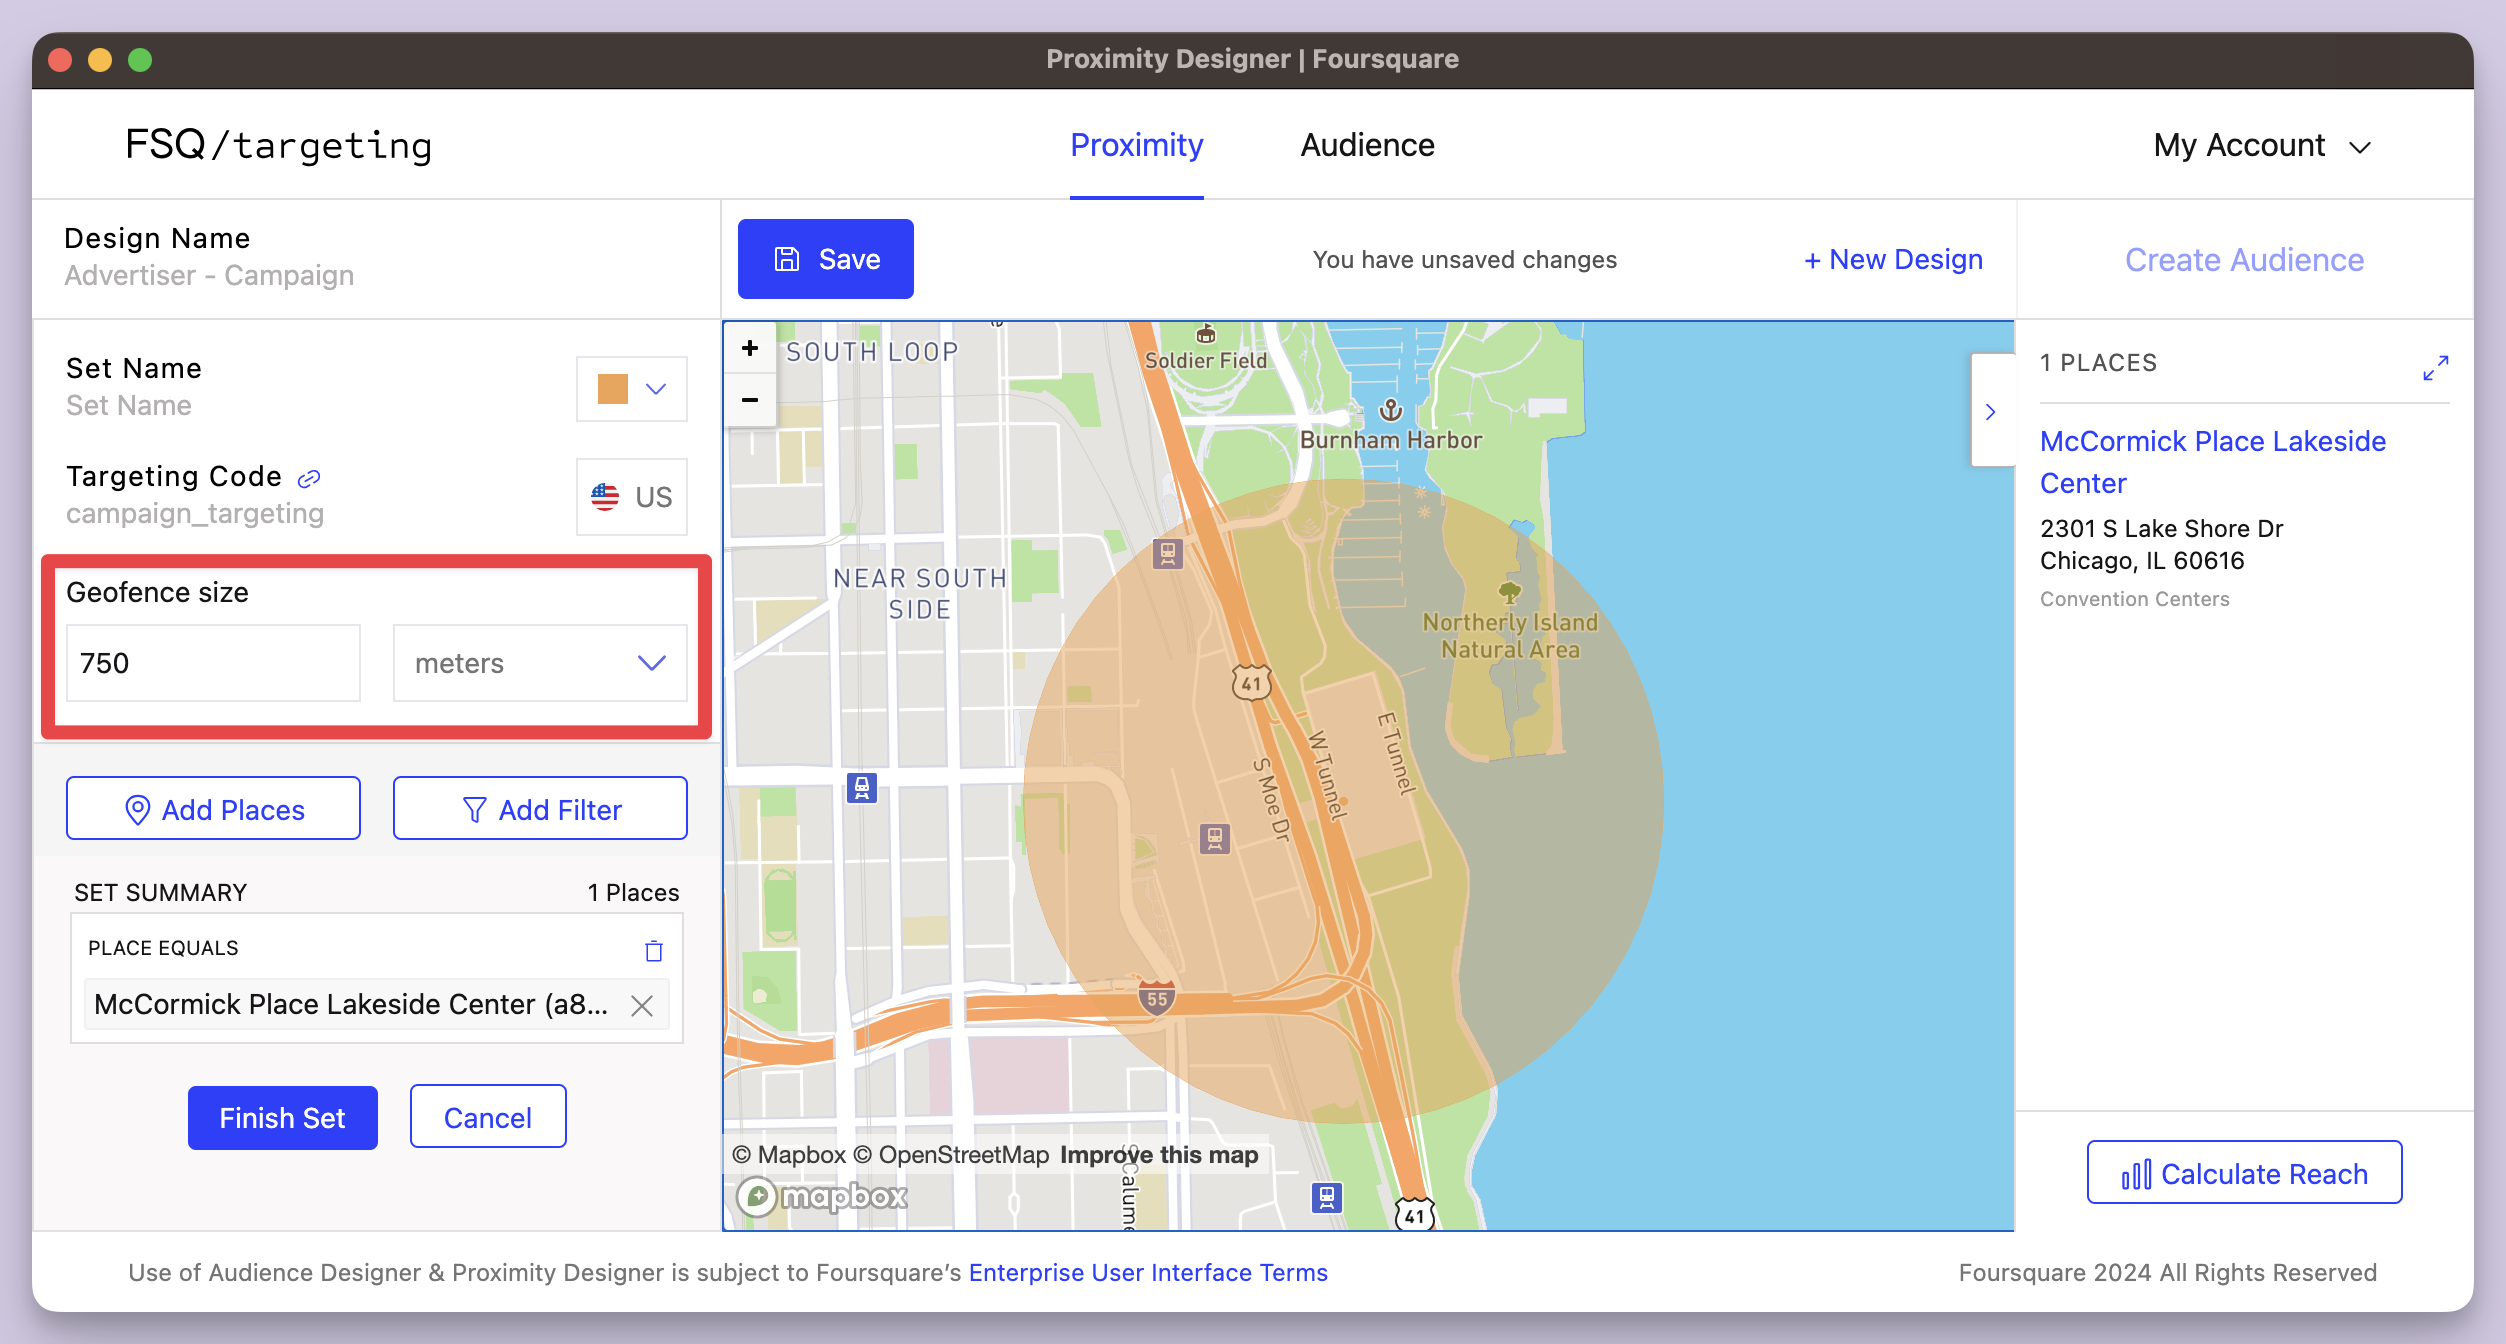
Increasing the geofence to a 750 meter radius.
You may wish to increase your geofence to capture more of an area. In the above example, the geofence surrounding the McCormick place is increased to include a broader set of visitors to the large convention center who fall outside of the standard radius.
However, if accuracy to your location set is more important than a wider reach, you can opt to decrease your geofence size.
Maximum Geofence Size: 18 miles or 30kmYour geofence cannot be larger than 18 miles or 30 kilometers.
Calculate Reach
Click Calculate Reach at any time to see how many devices the segment will reach. This calculation considers the total number of active devices in the most recent month of source data. You can calculate reach while adding places, or across all locations in your set. Keep in mind that this is an estimate and the reach of your segment may vary when activated in your desired platform.

The Calculate Reach button in Foursquare Proximity.
Upon clicking Calculate Reach, the reach calculator appears. You can choose to calculate each set's reach individually, as well as the combined reach across all sets. In the example below, the reach for movie theaters and convention centers is calculated separately. The combined reach across these sets is also calculated.
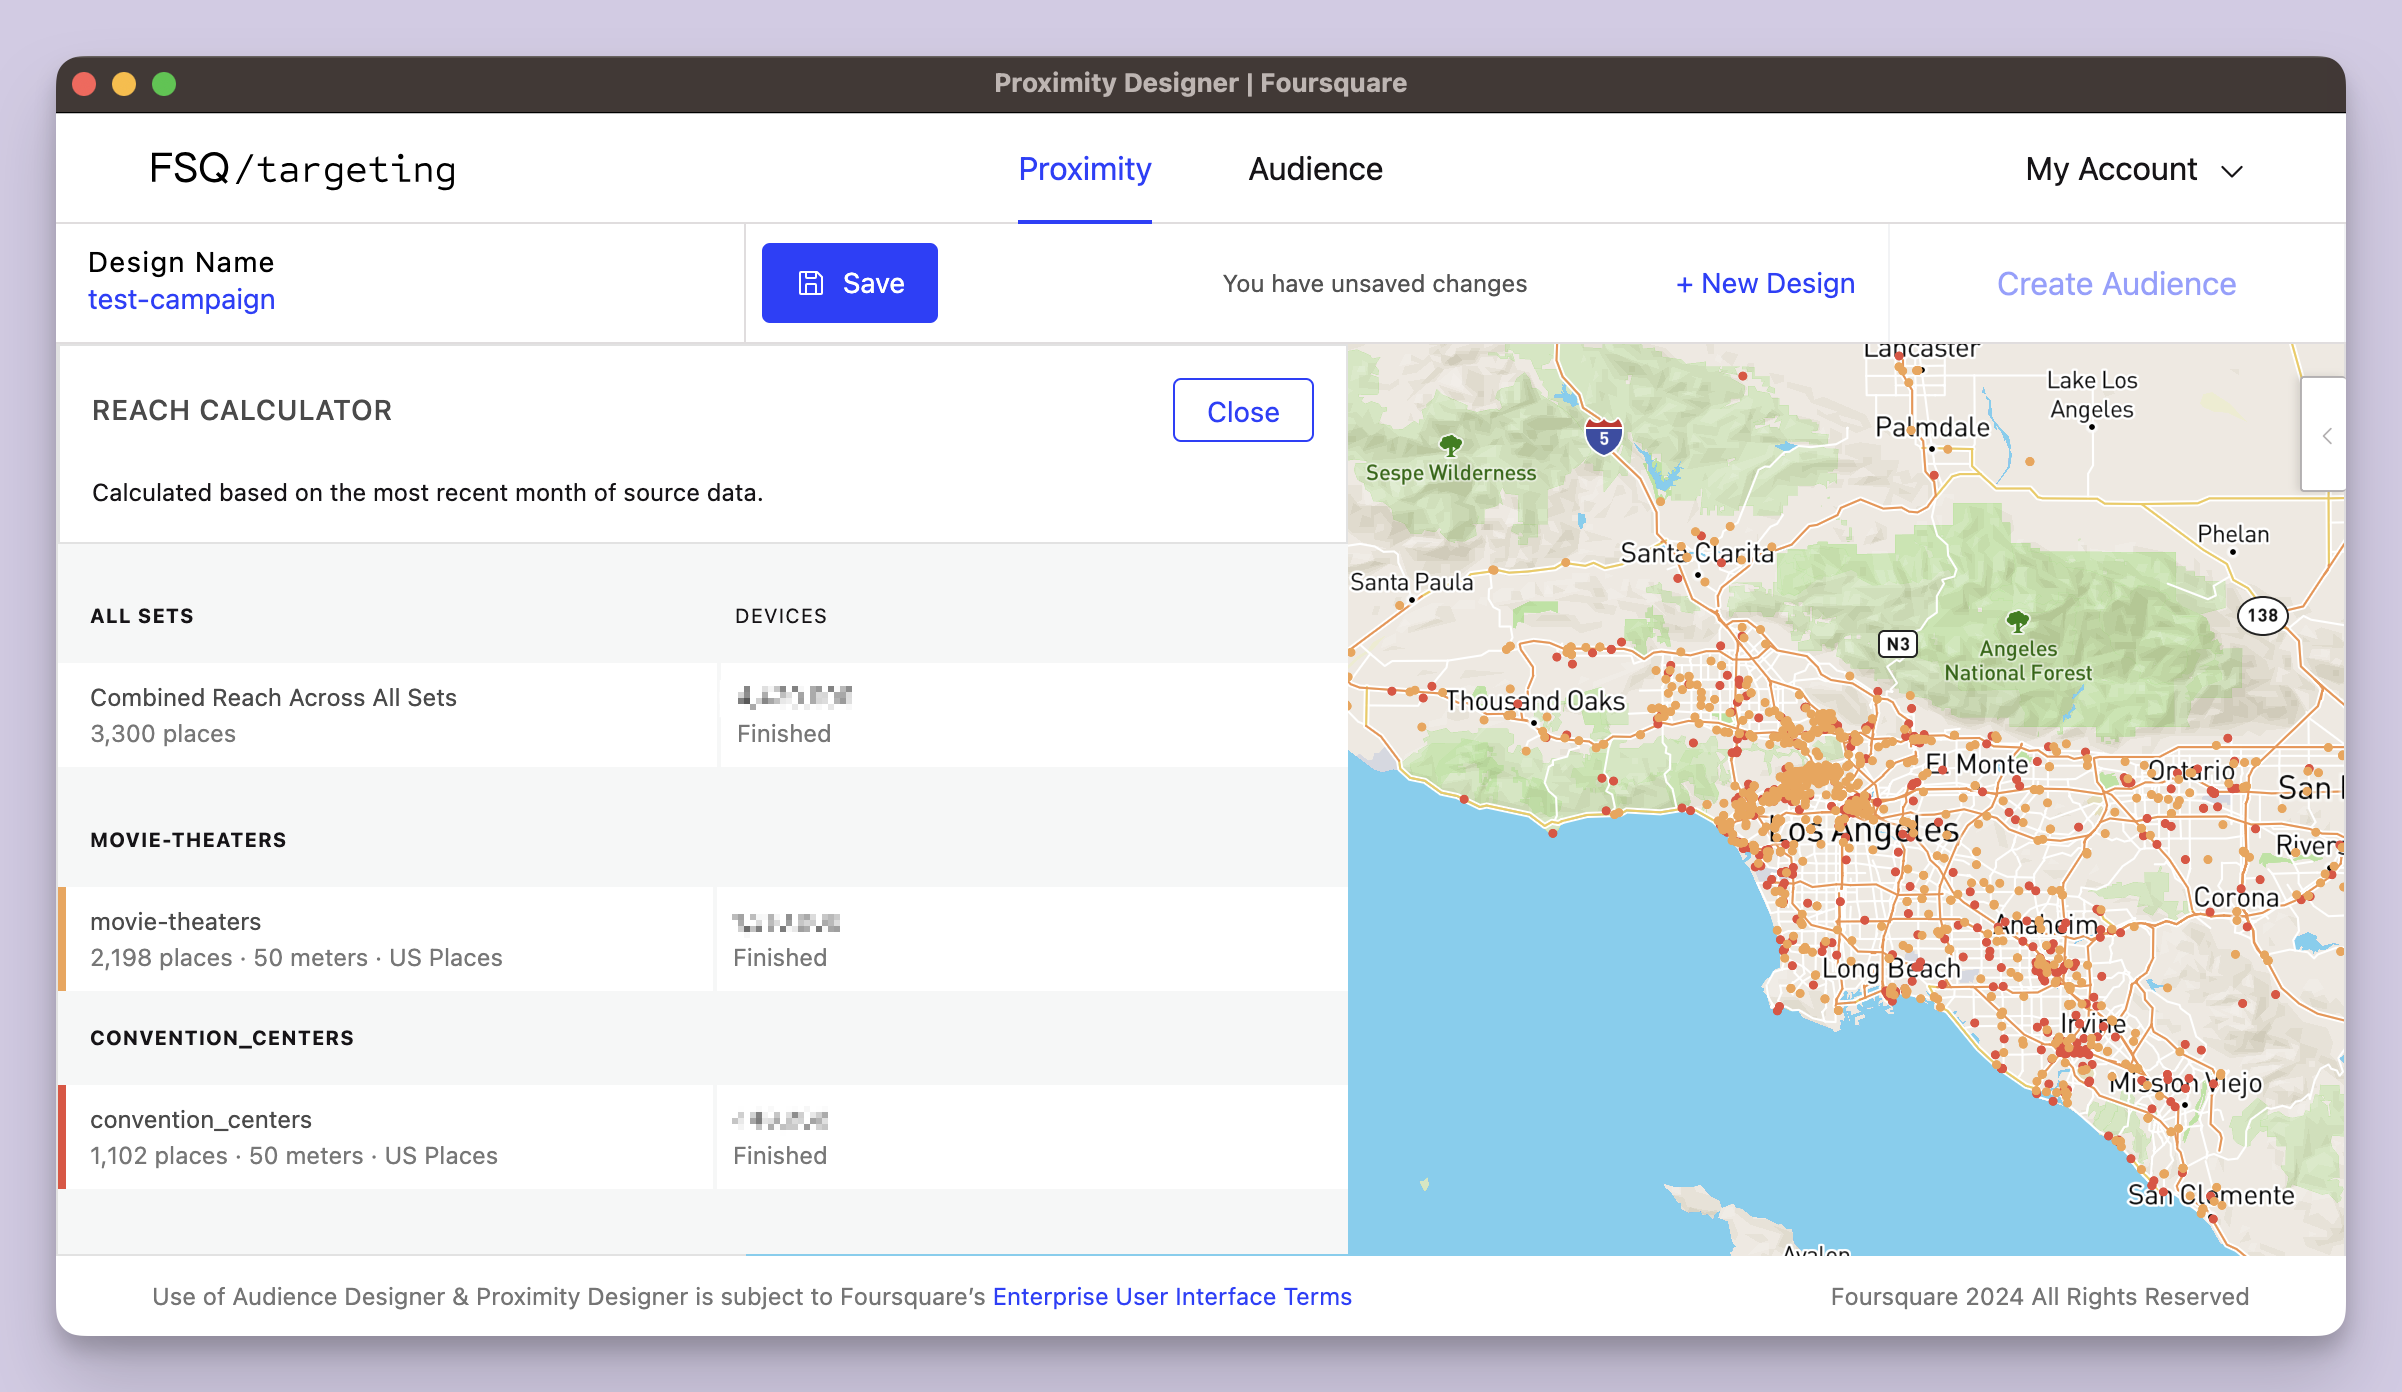
Calculating reach across the set (numbers hidden).
Save
Click Save to store your progress on your Foursquare account. This will not build your project, but instead save it in your My Designs page.
If you do not see the Save button, ensure that:
- Your design has a Name and Targeting Code (See table above)
- Your design is not empty
When you are ready to continue editing the saved design, simply click on its name on the My Designs page.
Build
When you're finished designing your segment, you can click Build to be redirected to the My Designs page. Here, you can fill in the final details to build your segment.
You'll be asked to fill out a brief form indicating your impression target, your campaign start/end date, as well as the DSPs you intend to upload the segment.
After completing the form, you'll be notified of updates on the deployment process either through email when deploying to a self-serve programmatic platform, or through the ticket you'll open in our customer support portal when deploying to a non-self-serve programmatic platform. See the list of Eligible Platforms here.
For more information about deploying your segment, please visit the Deploying Segments to DSP page. Deploying a segment is the same process for both Audience and Proximity products.
Still have questions?Visit our customer support portal for further support.
How are you liking Foursquare Proximity?We'd love your feedback! Share your experience by leaving us a review on G2.
Updated 5 months ago